Showing posts with label Fruit. Show all posts

Sunday, October 24, 2010

Buried Cherry Cookies

There's nothing like food containing a surprise. Savory items can hold surprises, like a Scotch egg (sausage stuffed with a boiled egg) or a turducken (turkey stuffed with a duck stuffed with a chicken stuffed with stuffing). Chocolate truffles and cupcakes are the more common confections in which you can hide a little surprise. And what better gift to send someone for their birthday than a delicious treat with something hiding inside.

Buried Cherry Cookies
Makes 42 cookies. From Better Homes & Gardens Cookbook.

Ingredients
10 oz maraschino cherries
1/2 cup unsalted butter, softened
1 cup sugar
1/4 tsp baking powder
1/4 tsp baking soda
1/4 tsp salt
1 egg
1.5 tsp vanilla extract
1/2 cup unsweetened cocoa powder
1.5 cups flour
1 cup semisweet chocolate chips
1/2 cup sweetened condensed milk

Directions
Drain cherries and reserve juice. Halve any large cherries, but leave the rest intact. Beat butter in a standing mixer on medium speed for 30 seconds. Add the sugar, baking powder, baking soda, and 1/4 tsp salt. Beat until combined, scraping sides of bowl if necessary. Beat in egg and vanilla until combined. Beat in cocoa powder and flour until just incorporated.

Technically a Thumbprint Cookie

Shape dough into 1" balls. Place dough balls about 2" apart on an ungreased cookie sheet. Press your thumb into the center of each ball and place a cherry in each center.

Loading Up the Cookies

For the frosting, combine chocolate chips and sweetened condensed milk in a small saucepan. Cook, stirring constantly, over low heat until chocolate melts. Stir in 4 tsp of the reserved cherry juice. Spoon 1 tsp frosting over each cherry, spreading to cover the cherry entirely.

Bake in a 350 degree F oven for about 10 minutes or just until edges are firm. Cook on cookie sheet for one minute, then transfer to a wire rack and allow to cool completely.

Buried Cherry Cookies

These cookies are an excellent addition to anyone's repertoire and look great on a holiday cookie plate. They are also a delight to make and wonderful to eat. Not only does the fudgy frosting have a light cherry flavor, but then *wham* you bite right into the maraschino cherry surprise in the middle. Don't listen to your parents - go ahead and play with your food.

Fig-Gorgonzola Pizza

Figs are one of the most ephemeral fruits of the summer growing season. For as sad as I am when strawberry season finishes up its few week run, it seems like figs are only around for a few days. I'm often underwhelmed by the ones available at the grocery store. They go moldy within a day or two of purchase. The fruit itself goes from green to ripened to gross within a very short time window. That fact makes it difficult to transport figs very far from their source. The only alternative to planting a fig tree myself is to go to the farmer's market. Once bought, plan on using your figs within a day or so to make sure they have the best flavor and texture. Here's the one recipe I managed to cook up during this year's fig season:

Fig-Gorgonzola Pizza
Makes 4 servings. From Bon Appetit.

Ingredients
Cornmeal
1 lb pizza dough
1.5-2 cups Gorgonzola
6 figs, thinly sliced
2 tbsp balsamic vinegar, divided
8 slices prosciutto
1 tbsp olive oil
8 cups arugula

Directions
Preheat oven to 450 degrees F. Sprinkle cornmeal on a large baking sheet. Roll dough out on a floured surface to approximately a 12"x10" rectangle (mine looked more like a triangle, but that's ok). Sprinkle Gorgonzola over dough (use whatever amount you are comfortable with; 2 cups is a pretty intense Gorgonzola flavor). Sprinkle with pepper. Bake pizza until crust is golden brown on the bottom, 15-20 minutes.

Naked Gorgonzola Pizza

Meanwhile, toss figs with 1 tbsp balsamic vinegar in a small bowl and set aside. When pizza is golden brown, immediately drape with prosciutto slices, covering the pizza completely. Arrange fig slices over the pizza. Bake until figs are just heated through, about 1 minute more. Transfer pizza to cutting board.

Pizza Topped with Arugula

Whisk remaining 1 tbsp vinegar and oil in a large bowl. Toss arugula and season with salt and pepper. Mound arugula on top of pizza. Cut into pieces and serve.

Pizza Slice

Dried figs, available year round, are quite delicious and make a lovely accompaniment to salty cheese or even in a sauce for meat. But fresh figs are a different animal (or plant) altogether. They are fresh and fruity with a very particular figgy flavor. Combine this sweetness with some salty Gorgonzola and meaty prosciutto and you've got a winning pizza. And why have a side salad when you can put it right on top of the pizza? The crisp crust forms a great base for all these toppings. And unlike the pizzeria versions, one quarter of this pizza is enough to make a good meal. Or cut it into smaller pieces and serve it as an appetizer. Whichever you choose, enjoy the figs while they last.

Saturday, September 11, 2010

Banana-Walnut Chocolate Chip Cookies

Banana bread is one of my kitchen staples. Give me 2-3 ripe bananas and 1 hour, and I can make you a phenomenal banana bread. But what if you wanted something more hand-held? Something that you did not have to slice. Something that can be divvied up with ease. Sounds to me like banana bread in cookie form.

Banana-Walnut Chocolate Chip Cookies
Adapted from Martha Stewart's Cookies.

Ingredients
1 cup flour
1/2 cup whole wheat flour
1 tsp kosher salt
1/2 tsp baking soda
3/4 cup unsalted butter, softened
1/2 cup sugar
1/2 cup light brown sugar
1 large egg
1.5 tsp vanilla extract
1 large, very ripe banana, mashed
1 cup rolled oats
8 oz semisweet chocolate chips
1/2 cup walnuts, coarsely chopped and toasted

Directions
Preheat oven to 375 degrees. Line baking sheets with parchment or spray with cooking spray. In a medium bowl, whisk together flours, salt and baking soda.

In a large bowl, beat butter and sugars with a mixer on medium speed until pale and fluffy. Reduce speed to low and add egg and vanilla; mix until combined. Mix in banana. Add flour mixture; mix just until combined. Stir in oats, chocolate chips and walnuts.

Drop dough by heaping tablespoons onto prepared baking sheets, keeping cookies about 2 inches apart. Bake until golden brown and just set, 12-13 minutes. Let cool on sheets on wire rack for 5 minutes. Transfer cookies to a wire rack and allow to cool completely.

Banana-Walnut Chocolate Chip Cookies

Martha's awesome ingenuity has yielded the perfect taste of banana bread and chocolate chip cookie. These treats really are great by themselves and don't need any sort of toppings or sauces to make them better. If anything, you may want to serve them sandwiched around some vanilla ice cream. You know, just to cut the sweetness.

Saturday, August 21, 2010

Mixed Berry Pandowdy

Berry season is about at an end with the last of the fresh blueberries disappearing quickly and the rest of the berries are but a memory. A Southern classic with berries and, really, any fruit, is a cobbler. But to celebrate these small fruits, I wanted something a little out of the ordinary.

It turns out that cobblers are but a small subset of desserts that all have two-layer (fruit and cake) construction. Whether it's a cobbler, grunt, slump, brown betty, buckle, sonker, crisp, or crumble. The major distinctions that separate these varieties is the preparation of each layer. The fruit can be sauteed or baked. The cake layer can be crumbly, biscuit-like or cakey. Flip the layers and, technically, it's a pie. From all of these, I went for a recipe for a mixed berry pandowdy, where the berries are left whole and covered with a cake batter and baked until done.

Mixed Berry Pandowdy
Adapted from Elle's New England Kitchen, makes 6-8 servings

Ingredients
Berries:
5-6 cups mixed berries
3 tbsp maple syrup
1/2 tsp cinnamon
1/2 tsp nutmeg
Pandowdy:
1 cup flour
1/4 cup sugar
2 tsp baking powder
1/2 tsp salt
1/2 cup milk
1 egg
6 tbsp unsalted butter, melted
2 tsp vanilla extract

Directions

Berry Mixture

Preheat oven to 350 degrees F. Lightly grease a glass 2 quart baking dish (about 12"x7"). Place berries in baking dish and drizzle with maple syrup. Sprinkle with cinnamon and nutmeg and toss to combine. Bake berries for 15 minutes.

Meanwhile, whisk the flour, sugar, baking powder, and salt in a medium bowl.

After the berries have finished baking, whisk milk and egg together in a small bowl. Stir in the butter and vanilla. Stir this wet mixture into the flour mixture and pour over the hot berries. Spread out the batter with a spatula. Return to the oven and bake for 25-30 minutes or until lightly brown and a toothpick inserted into the cake comes out clean.

Mixed Berry Pandowdy

Cool for a bit, then scoop into bowls while it is still warm. The servings will be messy no matter how you do it, so you may as well give into the rustic nature of the dish. Add a touch of vanilla ice cream if you wish.

Pandowdy Bowls

The great part about this dessert is that it lets the berries shine through. In theory, the best way to enjoy berries is fresh and plain or with yogurt or whipped cream. In reality, who does not love a great berry dessert that lets the berries do their thing. The cake on top of the berry mixture is not overly sweet and helps to contrast the intense berry taste with some plain vanilla cake flavor and texture. Plus the fruit looks beautiful studded onto the canvas of the cake. This dessert has all the makings of a summer favorite - quick, easy, light, and tasty.

Thursday, July 29, 2010

Granola

Granola is a word that can conjure many images. I often think of it as a cereal that requires a lot of work to eat. It can also evoke ideas of "hippies" and "rabbit food." Other people are quite enamored with the cereal mix and make it part of their daily lives. I think granola suffers from a large amount of variability in preparation. Some make it into extra crunchy bars. Others keep it more bland and soft. They can contain nearly any ingredient, from antioxidant-filled dried blueberries to less-than-healthy chocolate chips and candies. The only solutions are to either keep trying bag after bag until you find the one you like or craft your own to your personal preferences. Here is how, in under an hour, you can make your own tasty granola.

Granola
Yields 5 cups. Adapted from Bon Appetit magazine.

Ingredients
3 cups old-fashioned oats
1 cup coarsely chopped pecans
1/2 cup unsweetened coconut
3 tbsp brown sugar
3/4 tsp ground cinnamon
1/2 tsp ground ginger
1/4 tsp salt
1/3 cup honey
2 tbsp vegetable oil
1/2 cup dried cherries
1/2 cup dried strawberries
1/4 cup chopped dates

Directions
Preheat oven to 300F. Line a rimmed baking sheet with parchment paper.
Mix together the first seven ingredients.

Granola, Step 1

Mix honey and oil in a saucepan and cook over medium-low heat until smooth, about 3 minutes. Pour this mixture over the oat mixture and toss to coat evenly. Spread this on the prepared baking sheet. Bake for about 40 minutes until golden brown, stirring every 10 minutes. You can remove the pan from the oven earlier if you want your granola softer or leave it in longer if you want it more crunchy.

Granola, Fresh from the Oven

Allow the granola to cool completely. Stir it occasionally as it cools to ensure that clumps don't form (unless you like large clumps, then let it cool undisturbed). Stir in the dried fruit and enjoy.

Strawberry-Cherry Granola

The versatility of this recipe makes it hard not to like it. I got to put one of my favorite fruits (strawberries, in dried form) into this batch, but I could easily see many other ingredients in the mix. Nearly any nut would be great, as would pumpkin seeds, sunflower seeds, other cereals, any dried fruits, and, if your sweet tooth is acting up, various candies. I enjoyed this granola immensely, probably moreso than any other version I've tried. Part of it is, undoubtedly, that I made it with my own two hands and I knew that there were no strange chemical additives. The other part is that I tailored it to my tastes. This version was more simple, but has been great as a snack or for breakfast with milk. I will definitely make other versions of this granola in the future and it may become a delightful staple in my diet.

Saturday, July 10, 2010

Blackberry Sorbet & Ice Cream

Frozen desserts come in all sorts of shapes and sizes. There's everything from the icy granita to fruity sorbet to the Americanized sherbet to creamy gelato to the waffle-cone-crowned king of them all, ice cream. I had a tough decision to make when trying to choose which of these frigid treats to make, and in the end I simply refused to decide.

Monster Blackberries

Blackberry season is upon us. I found these monstrous fruits at my local farmer's market. One taste of these violet clusters will make your mind start spinning with possibilities. After much thought, I decided to make both a blackberry sorbet and a blackberry ice cream. It is summer, after all, and you cannot have too many treats to keep you cool.

Blackberry Sorbet
Source: The Ultimate Ice Cream Book. Makes 3 cups.

Ingredients
1/2 cup water
1/4 cup light corn syrup
3 cups blackberries
1 tbsp lime juice

Directions
Combine the water, corn syrup and sugar in a small saucepan. Place over medium heat and stir until the sugar dissolves. Raise the heat and boil without stirring for 1 minute. Turn off the heat and let the mixture cool to room temperature.

Straining the Berries

Place the syrup, blackberries and lime juice in a food processor and puree until smooth. I strained the mixture after this because the seeds in blackberries love to get stuck in my teeth. Cover and refrigerate until cold. If you are using an ice cream maker that generates its own cold (i.e. not with a frozen bowl), then you can skip the refrigeration.

Stir the sorbet base and pour into ice cream maker according to the manufacturer's instructions. When finished, you can eat the sorbet right away or freeze it until it's more firm.

Blackberry Ice Cream
Adapted from Not So Humble Pie. Makes about 1 quart.

Ingredients
1.5 cups blackberries
1/4 cup light brown sugar
1 cup sugar
1.75 cup heavy cream
1 cup milk
1/2 cup cream cheese
1 large egg (if you're worried about the raw egg, you can leave it out)
1 dash of lemon juice

Directions
Using a food processor, blend together the blackberries and brown sugar. Strain the mixture as in the previous recipe, if desired. Add the remaining ingredients to the food processor and blend until everything looks homogeneous.

Blackberry Ice Cream

Chill the mixture in the refrigerator. Pour the ice cream base into the ice cream maker according to your manufacturer's instructions. Enjoy right away or freeze for a firmer final product.

Blackberry Twins

The first aspect of making these two desserts back-to-back was that the sorbet turned out a very dark, black-purple color while the ice cream was a lovely lavender (perhaps good for Easter-time?). The sorbet has a very intense blackberry flavor. Depending on the tartness level of the berries you choose, it could easily be anywhere from very sweet to quite bitter, so I would recommend only making this when you have moderately sweet blackberries on hand. The ice cream was very creamy and had a more subtle flavor. I was surprised by the addition of cream cheese (mascarpone in the original recipe), and you can taste it in the background. In the end, I'm glad I made both desserts because they go very well together.

Saturday, June 19, 2010

A Tale of Two Muffins: Orange-Peanut Butter & Carrot-Raisin

This month, I'm in charge of bringing breakfast for my lab-mates on Friday mornings. I like to break from the usual bagels or ho-hum store-bought coffee cakes, so last week I took a different route - homemade muffins. This is by no means groundbreaking, but it is rare that anyone makes anything with their own two hands for our TGIF meal. So just to make it extra special, I decided to make two muffins. One sumptuous, indulgent and surprising; one healthy, fresh and wholesome.

Orange-PB Muffins

Orange-Peanut Butter Muffins
Makes 12 servings

Ingredients
1/4 cup canola oil
1/3 cup honey
1/3 cup chunky peanut butter
1/4 cup orange marmalade
1 large egg
1 cup fresh orange juice
1.5 cups flour
1/2 tsp baking soda
1/2 tsp salt

Directions
Preheat oven to 400 degrees F. Spray a standard-sized, 12-cup muffin pan with non-stick cooking spray; set aside.

In an electric mixer, beat together the oil, honey, peanut butter, orange marmalade, egg, and orange juice.

In a medium bowl, whisk together flour, baking soda and salt. Gently beat in flour mixture into PB-orange mixture just until incorporated.
Divide batter among greased muffin cups. Bake for about 20 minutes or until a toothpick inserted in the center comes out clean. Cool in muffin pan on wire rack for 10 minutes, then remove from pan and allow to cool completely.

These muffins turned out quite deliciously. The oil and peanut butter give the muffin a smooth, moist texture. The peanut butter and orange are in harmony on your tongue, neither pounding you over the head with their individual flavor, but instead both blending into the background. These could also make a great cupcake with any number of frostings (off the top of my head I could think of vanilla, peanut butter, orange, honey, cinnamon, or chocolate, but the possibilities are endless).

Carrot-Raisin Muffins

Carrot-Raisin Muffins
Makes 12 servings

Ingredients
1 cup flour
1/2 cup whole wheat flour
1/2 cup sugar
2 tsp baking powder
1/4 tsp salt
1/2 tsp ground cinnamon
1/4 tsp ground allspice
1/4 tsp ground nutmeg
1/2 cup unsweetened applesauce
1/4 cup canola oil
2 large eggs, lightly beaten
1 large carrot, peeled and shredded
1/2 cup raisins

Directions
Preheat oven to 400 degrees F. Spray a standard-sized, 12-cup muffin pan with non-stick cooking spray. Set aside.

In a large bowl, combine flours, sugar, baking powder, salt, and spices.

Using a standing mixer, beat applesauce, oil and eggs. Add shredded carrot and raisins and beat mixture until well combined. Stir in flour mixture just until incorporated. Divide batter among 12 muffin cups (about 2/3 full). Bake about 15-20 minutes until a toothpick inserted in the center comes out clean.

Cool in pan on a wire rack for 10 minutes. Remove from pan and allow to cool completely.

This may sound weird, but of these two muffins, the carrot-raisin were my favorite. Don't get me wrong. I'm a huge peanut butter fan. But when I think muffin, these beauties are what I imagine. The tops are rough and rugged, emphasizing the extra fiber from the whole wheat flour within. Instead of more oil, unsweetened applesauce makes the muffins moist. The carrot and raisin provide their own sweetness and nutrients to the mix. You could easily add some nuts or sunflower seeds to these. If you're so inclined, the addition of some rolled oats could make these into granola muffins. And for all of their nutritional good, they also play nice with your taste buds, imparting their fresh flavors.

Cupcake Courier

As an aside, I want to mention my newest kitchen acquisition - the cupcake courier. I've seen various people carrying these and they really are a good idea. I bought mine from Amazon. Not only can it carry three dozen muffins or cupcakes in three stacked layers, but as you can see from the picture, it even separates the layers with enough room to decorate the cupcakes. In the past I've used the disposable foil bake-ware from the grocery store, but even then you often can't get all of your cupcakes in one tin. It does take up some extra storage space in my house, but it's well worth it.

Both of these muffins are delicious in their own particular ways. When it comes down to it, even without getting into food preferences, these two muffins offered my co-workers their own ways for starting their Friday. If you need that boost of sugar and feeling of luxury on your lengua to trick yourself into finishing the week, then there's a muffin for that. If you like to start your morning feeling healthy and empowered, there's a muffin for that. Now I just need to figure out how to make a muffin that can wash the dishes.

Sunday, May 23, 2010

Banana "Ice Cream"

How many recipes that you know of have exactly one ingredient? Not many I would suspect. Even if you are just sauteing some spinach, you still need oil, salt and other seasonings to make it interesting. Well I have finally found a one-ingredient dessert that is as healthy as grabbing a piece of fruit.

Banana "Ice Cream"
Makes approximately 4 servings

Ingredient
4 bananas

Frozen Banana Slices

Directions
When the bananas are to the ripeness you like, slice them up. Either place them in a plastic container or lay them out individually on a baking sheet and put them in the freezer. With the baking sheet method, you obviously need more space, but you will also avoid the problem of the slices sticking together. After the bananas are frozen, be sure they are moved into an airtight container until you are ready to make dessert. This is also a good method for preparing bananas for smoothies that avoids adding tons of ice to the mix.

When you're ready to finish the recipe, remove the bananas from the freezer. Transfer the slices to a large food processor. Turn on the food processor and let it run until the bananas form a smooth paste. This will be very loud at first as your food processor struggles against the icy bananas, but soon it will chop them into a lot of small bits that will start to melt and meld together into the final product. Remove the pureed frozen bananas, place them in an airtight container and place back in the freezer to firm up, at least 30 minutes.

Banana Ice Cream

Remove the "ice cream" from the freezer and scoop into bowls. I recommend one scoop as a good serving size since it seems that you get four servings from pureeing four bananas. The one drawback of this very simple method is that the ice cream can be a little dense and icy. Since we did not use an ice cream maker to slowly freeze and churn the bananas, larger ice crystals can form. But if you let the ice cream sit out for a couple minutes, it will soften up. Other than that, this is one of the healthiest desserts I've ever made. It involves no addition of other sources of calories and it is 100% fruit. You taste nothing but unadulterated banana goodness. No fake flavors here (think Laffy Taffy) or strange additives. This is the perfect treat if you are watching your calories or if you want a break from overly processed foods.

Banana Ice Cream with Strawberry Jam

If you do want to add some interest, feel free to doctor up this recipe as you wish. You can make a sundae out of it or just add your favorite ice cream accompaniment. I added some of my homemade strawberry jam, but you can use chocolate sauce, whipped cream, nuts, maybe even peanut butter if you're so inclined. Granted, this does deter from the healthiness of this dessert, but you start with a healthy base so a few more calories won't hurt, right?

Strawberry-Lime Cupcakes

With the close of strawberry season, this will be my last in this series of berry-inspired eats. I stumbled across this cupcake recipe a few years ago and knew I would make it some day because it combines some of my favorite flavors. I just had to wait for the right place (Durham) at the right time (the peak of berry season). When making a recipe that showcases a particular ingredient, you want to get it at its prime. So now this fruit treat has come to fruition.

Strawberry-Lime Cupcakes
Adapted from Food Network, makes 6 large cupcakes

Ingredients
Cupcakes
1.5 cup flour
1.5 tsp baking powder
1/4 tsp salt
2 eggs
2/3 cup sugar
3/4 cup unsalted butter, melted
2 tsp vanilla extract
1/2 cup milk
Icing
1 1/3 cup powdered sugar
1.5 tbsp lime zest
2 tbsp lime juice
1 drop green food coloring
Assembly
6 strawberries, hulled
Mint

Directions
Preheat oven to 350 degrees. Grease a jumbo muffin tin with cooking spray. Whisk flour, baking powder and salt together in a medium bowl.

Using a standing mixer or an electric beater, beat the eggs and sugar until light and foamy, about 2 minutes. While beating, gradually add the butter and vanilla. Turn mixer to slow and gradually add half the flour mixture. Mix in all of the milk, then the other half of the flour mixture. Divide batter evenly amongst muffin cups.

Bake cupcakes until a toothpick inserted in the center comes out clean, 25-30 minutes. Remove from oven and cool in the tin for 10 minutes, then remove and cool completely on a wire rack.

To make the icing, whisk the powdered sugar, lime zest and lime juice in a medium bowl. You can add more lime juice if your icing is still too thick to spread. Mix in food coloring to make a pale green color.

Inserting the Strawberry

Use a paring knife to cut a cone out of the center of the cupcake. Don't worry if it takes a couple of tries to get the hole big enough. Just be sure not to cut all the way through the cupcake. Insert one hulled strawberry into the opening.

Hiding the Strawberry

Cover the strawberry with part of the cupcake that was removed. I took the cone of cake and cut off the top part to help hide the berry. This does not have to be that pretty or complete as you have icing to hide any imperfections.

Strawberry-Lime Cupcakes

Spread the icing over the tops of the cakes. Try to make it as even as possible. Garnish with mint leaves, if desired.

Hidden Strawberry Surprise

The end result is a large, delicious treat bearing a hidden surprise inside. I prefer to keep my baked goods a mystery, especially when they are stuffed with something and let tasters find it on their own. The cake itself is a simple white cake with good sweetness and vanilla flavor. The lime icing really brings it all together with a sweet-tartness to accentuate the berry and add interest to the cake without overwhelming it with too much sugar. If you use the mint, it adds an almost mojito like taste to the cupcake, which now makes me want to try making a mojito with strawberries muddled together with the mint. I would definitely make these if you want to wow some friends, family or coworkers. These cupcakes are an excellent coup de grace for what has been a delicious whirlwind of a strawberry season.

White Chocolate Strawberries

One of the classic and elegant ways of preparing strawberries is to simply dip them in chocolate. In fact, I don't believe I've ever had a chocolate-berry combination that I did not like. And another of my goals for this season's haul was to make my own chocolate-dipped strawberries. Had I known this was so easy and tasty, I would have been doing this myself years ago.

White Chocolate Strawberries

White Chocolate Strawberries with a Twist
From Bon Appetit, makes 16

Ingredients
2 tbsp sugar
1/2 tsp orange zest, chopped
1/2 tsp lemon zest, chopped
6 oz white chocolate, chopped
16 large, ripe strawberries

Directions
Line a baking sheet with foil or a silicone mat. Using fingers, mix sugar and citrus zests in a small bowl until well mixed. Be sure to chop the zest, otherwise you'll end up with larger globs of this citrus sugar that aren't as appealing to the eye.

Melt chocolate either over a double boiler (in a glass bowl set over a saucepan of simmering water) or in short bursts in the microwave. Stir to be sure it is smooth.

Hold strawberry by its leaves and dip into chocolate. Allow excess to fall off the berry. Turn berry pointed-end-up and sprinkle with the citrus sugar. Place on baking sheet. Repeat with remaining berries. Chill in the fridge until the chocolate sets (room temperature just doesn't do the trick).

The best part about these berries is that the citrus really livens the flavor of the berry. I've come to appreciate that when pairing strawberries with other flavors, it is a good idea to play off of their bright zestiness. Champagne pairs well because of the effervescence. Citrus flavors, particularly lime and orange, go very well with berries too. A balsamic vinegar-based sauce is also an excellent option. In this recipe, the white chocolate (a more subdued chocolate since it is more vanilla than cocoa) provides a nice base for the citrus, both in structure and in taste. The citrus is more subdued than I originally thought, so it does not overwhelm the senses and allows the chocolate and the berries to shine through. If you're not in the mood to bake a dessert, these berries are a quick crowd-pleaser.

Wednesday, May 19, 2010

Strawberry-Turkey Panino

After an afternoon of jamming, I wanted a strawberry-themed lunch without resorting to a salad. Luckily, Southern Living had a recipe for a sandwich using fresh strawberries. I changed a little bit to suit my own needs and pantry, but the spirit of the sandwich remains the same.

Building the Panino

I started with two slices of whole wheat bread and built my sandwich containing 5 slices of smoked turkey lunch meat, 1 slice of muenster cheese, 4 basil leaves, and three sliced strawberries. Be sure to keep the cheese to the outside and the berries and basil to the inside of the sandwich to get the cheese melty but the produce still whole.

Panini Press

For equipment, I used my George Foreman grill. No need to buy a separate panini press when a nearly ubiquitous Foreman grill works just as well. I buttered both sides of the sandwich to get a good crust and put the sandwich on for just a couple minutes.

Strawberry-Turkey Panino

In less than five minutes I made myself a hot and berry-licious lunch sandwich. The original recipe calls for brie instead of muenster, but I feel they both work well with the strawberries and the turkey. The cheese doesn't overwhelm the smokey flavor of the meat or the luscious berries. And the basil adds a fresh pop of licoriceness to add extra intrigue. I would recommend using a sturdier bread such as Italian when making the sandwich so it does not look quite as flattened as mine, but other than that this idea for a lunch is both simple and flavorful.

I don't like to harp on grammar since I'm sure I make all sorts of egregious errors, but it is worth noting something that has been bothering me for some time. The Italian word for "sandwich" is "panino." When plural, it becomes "panini." So if you are referring to a single grilled sandwich, it is a panino, not a panini. And, worst of all, "paninis" is not a word as it would be the same as saying "sandwhicheses." We all have our pet peeves and this just happens to be one of mine, so thanks for bearing with me.

Strawberry Jam

Warning: Anyone who does not find strawberries to be gifts from the heavens, rubies of pure indulgence or seed-studded sensations should pay no attention to the following series of posts. With nine pounds of strawberries in my fridge, I have been having a berry-fest to use all of these wonderful fruits while they're still at their prime. Ever since last year's picking season, I've wanted to make strawberry jam and now that I have the raw materials, I've finally realized this goal.

Jam making is both easy and difficult. Grandmothers have been jamming and canning for generations and passing their bounty (for ill or for good) onto their progeny. But for as straightforward as it can seem, there are many paths that lead to the same goal - spreadable, sweet fruit spread. All jams contain berries (duh), but the rest depends on how much work you want to do. If you want a firmer jam, you need pectin since strawberries have little natural pectin. You also need inhibit the growth of bacteria somehow. There are two main methods used - cold or heat. With cold, you have freezer jam where your end product sits in the freezer. The bitter cold prevents bacteria from growing. With heat, you have to immerse the jars of jam in boiling water for 10ish minutes in order to kill the bacteria either on the jar or in the jam. This method also seals the jar so it is stable at room temperature since it is (nearly) sterile.

I perused the internet to find my path and found it at Pick Your Own. These are step-by-step directions for strawberry jam using the heat method featuring many pictures and charts to help you on your way. I won't detail every step since the author(s) of that website have done a far better job than I (it is very difficult to remember to take pictures when your stirring molten berries or burning yourself with boiling water). I just want to point out some crucial details during the whole process.

First of all, make sure you have all of the ingredients before you start. In most cases this is a no-brainer since you know you need strawberries and most people have sugar on hand. I did not read the directions all the way through and did not see that you need 1-2 boxes of pectin (available in grocery stores by jamming and canning supplies). I would also HIGHLY recommend buying a ladle, a jar grabber and possibly a canner pot. Careful ladling makes the jar funnel unnecessary. The jar grabber is a pair of tongs modified for picking up jars by their necks while they're boiling. Don't assume you can do without because I definitely had to MacGyver a method mid-boil. I also have a very tall soup pot that I used, but a canner might work better if you don't mind another pot hanging around.

Cooking the Jam

I used about 4-5 lbs of berries for 4 large Ball jars of jam. Without additional boxes of pectin, I was not able to get the berries as set as I would have liked, but they still set up pretty well. Plus, skimming excess foam from the berries is a delicious preview of your final product. Feel free to eat as much as you can stomach.

Strawberry Jam

If you're starting from freshly picked berries, it will take a couple hours to clean, cut, cook, and can the jam, but it is so worth it. Think about it this way: I picked my berries at 8:00am and by the afternoon (I took time to see a movie) I had jam. From the vine to the jar to my toast in the same day. You can't get any fresher than that.

Jam on Toast

Thursday, May 13, 2010

Strawberry Picking

STRAWBERRY SEASON IS HERE! Strawberries are one of my favorite fruits in the whole world and this year I committed myself to obtaining them from the source. I woke up early last Saturday and drove about 20 minutes north of Durham on Guess Rd. and found myself at Double R Cattle Services. Don't worry about the name, they have strawberry patches too. And no, you don't have to pick them while cows are hovering over you. That could be a good business to get fresh cream with your strawberries, but I don't think that's part of their business model. Anyways, on to the berry picking...

Strawberry Plants

The first thing you may notice is that these plants are laden with strawberries of all sorts of ripeness. Everything from the white flowers to the green nubs to the large red berries. Your goal is to only pick the red berries. The reason behind this is twofold: 1) you get the best sweetness out of red berries, and 2) leaving some of the unripened berries benefits people who come to pick their berries in the next couple of days.

Rows upon Rows

The farm has a large field of strawberries with about 15-20 rows of plants. Everyone gets their own row if there's room and you go to town picking. I like to pick the berries with a little stem still on in case I want pictures later. I don't recommend this, but you can eat a couple berries as you go. You do pay by weight so this is a little shady, but how can you resist not popping one of these red marvels into your mouth?

Berry Picker

You don't have to pick your own berries if you don't want to. You can pick up a freshly picked batch while supplies last. It is a little labor intensive to kneel, squat or bend over to pick all these berries. So the farmers have a device that suspends them over the berry patch while laying down. Don't worry, you shouldn't need this device unless your plan is to pick more than 20 pounds of strawberries. Plus it feels more natural and fun to do it on your own.

Row Flagging

The farmer's system is that they place flags at the end of each row. When you're done picking, you move the flag of a particular row to the point where you stopped. I would recommend being very thorough in picking all the ripe berries in your row because the next group of people will start at your flag and any ripe berries in your "already done" section will go to waste. It is a cleverly simple method, but it works well I think.

Buckets o'Berries

I picked two baskets worth of berries. I may have just been overly excited about going picking, but I felt I drove a half hour to get there so I might as well get my fare share. These two baskets together contained 9 pounds of strawberries that cost $11.25. Not bad for a half hour's work.

Washed Berries

I'm guilty of never washing my fruit when I get it home from the store. But I made an exception for these berries. There was not much dirt on them, but there were bits of straw that definitely would not fit into any of the recipes I had planned for these beauties. After a good wash, I patted them dry and stored them in the fridge. I would recommend using your berries the same day if you can, or maybe even the next day. They are at their peak ripeness when you pick them, so they are only going to get mushier or more dried out as time goes on. Plus, you can brag to your friends and family that the pie you are serving contains berries that just that morning were still hanging on to their plant.

Strawberry Sideshow

The normal berries look absolutely gorgeous, but I'm more interested in the freak show berries that you find. You often have berries with multiple lobes, but some of the others that grow are just downright weird. I had one that looked like a tripod, one with a rhinoceros-like protrusion, and a selection that looked like little octopi with different numbers of leg-buds. Nothing is wrong with these berries and they were every bit as good as the rest, but they are just a bit different.

Strawberry picking was a great experience. I normally relish sleeping in on the weekends, but this was definitely worth sacrificing a little sleep in order to have some of the tastiest berries you can get at your disposal. Plus, this is only the beginning. You still have to decide how to use your red harvest. And believe me, that is quite a dilemma, especially when you can just eat an entire basket by itself.

Sunday, May 9, 2010

Chocolate-Mango Whoopie Pies

Mangoes are in season right now and they are life-changingly good. I was slicing one the other day and one taste sent me into a frenzy. Before I knew it the flesh was gone and I was gnawing on the pit. I went out and bought a whole slew of mangoes and, while I was elbow deep in one, I thought to myself, "What else could I do with one of these beauties?" One idea came to mind: whoopie pies!

Chocolate-Mango Whoopie Pies
Adapted from 13 Bakery, makes about 12 pies
Cakes
1.75 cups flour
3/4 cup cocoa powder
1.5 tsp baking soda
1/2 tsp salt
1/2 cup butter, softened
1/2 cup sugar
1/2 cup brown sugar
1 cup milk
1 egg
1 tsp vanilla extract
Filling
1 mango, peeled, diced
1 tbsp grated ginger
1 tbsp sugar
1/2 cup butter, softened
8 oz cream cheese, softened
1 tsp vanilla
3 cup powdered sugar

Preheat oven to 375 degrees and cover a cookie sheet with parchment paper or a silicone mat. Whisk together flour, cocoa powder, baking soda, and salt.
In medium bowl, cream together butter and sugar until light and fluffy, about 2 minutes. Add the egg and beat to combine. Beat in milk and vanilla. Beat in flour mixture just until combined.

Using an ice cream scoop, drop mounds of batter onto cookie sheet. Try to keep the mounds as round and even as you can because the pie halves will retain whatever shape you give them at this point. In other words, if you make ugly mounds, you'll get ugly pies. Bake 8-12 minutes until top springs back when touched. Cool completely on wire rack.

For the filling, start by cooking the mango in a saucepan over medium heat. Add grated ginger and sugar and cook mixture until the mango is soft. Cool completely. Beat the butter and cream cheese until well combined and fluffy. Add in vanilla and mango mixture and beat until combined. Gradually beat in powdered sugar until mixture is smooth. Feel free to add more powdered sugar if you want a stiffer filling.

To assemble the pies, spread a large dollop of the filling on the bottom of one of the pie halves. Then affix another pie half on top of this (the round sides should both be facing out). I'll leave the quantity of filling to be used up to you since some people like theirs oozing over the sides while others prefer a more modest amount.

Chocolate-Mango Whoopie Pies

These pies were very good. The chocolate in some respects overwhelmed the mango in the middle, but mango definitely made its presence known. Perhaps some sort of ginger or spice cake on the outside may be better next time, but chocolate is the classic flavor. Plus, everyone loved these whoopie pies. They did not quite elicit the yells of "Whoopie!" like the story of this dessert's Amish roots, but that may be because everyone had their mouth full.

Pineapple Hibiscus Cupcakes

Another celebration in lab, so it's time for some small cup-sized delights. I perused my ever-growing collection of cupcake cookbooks for inspiration. Lo and behold, inside of Pamela Clark's Cupcakes I found what I was looking for - pineapple hibiscus cupcakes.

Pineapple Hibiscus Cupcakes
Makes 12 cupcakes
Cupcakes
1/2 cup vegetable oil
3 eggs, lightly beaten
1.5 cups self-rising flour
3/4 cup sugar
1/2 tsp cinnamon
2 cups carrot, grated
3/4 cup crushed pineapple, drained
Flowers
1.5 tbsp sugar
1.5 tbsp water
12 slices of pineapple, wafer-thin
Frosting
2 tbsp butter, softened
3 oz cream cheese, softened
1 tsp lemon zest
1.5 cups powdered sugar

Dried Pineapple

The main feature of these cupcakes are some amazingly beautiful "flowers" on top, and it does take some time to create these beauties. First step - dehydrate some pineapple. Mix sugar and water together in a small saucepan and place over medium heat until sugar dissolves. Brush both sides of pineapple slices with this syrup and place on a wire rack over a baking sheet. Bake at 250 degrees for 1 to 1.5 hours until the pineapple is dried and turning brown on the edges.

Making Hibiscus

Immediately after removing the pineapple from the oven, crumble the slices and place them on an egg carton to dry completely. I let mine dry overnight and they were mostly fine, though they probably could have dried for longer to make sure they kept their shape.

For the cakes, combine oil, eggs, flour, sugar, and cinnamon. Add in carrot and crushed pineapple. Divide mixture among 12 baking cups and bake at 350 degrees for about 30 minutes until a toothpick comes out clean. Cool completely on a wire rack then remove from the muffin pan.

Meanwhile, prepare the frosting. Beat butter and cream cheese in a mixer until smooth and fluffy. Beat in lemon zest. Gradually beat in powdered sugar. Spread frosting on cakes and top with a pineapple flower.

Hibiscus Cupcakes

Flavorwise, these cupcakes were delicious. The cake itself was not too sweet but had good flavors from the pineapple and carrot (plus having fruits and veggies makes these things healthy, right?). The frosting was the sweet counter to the cupcakes with a delightful lemon twist.

Hibiscus Cupcake

Between the cake and the frosting, these were good cupcakes, but the clincher was the flowers. People were genuinely amazed by the them and most thought they were real flowers upon first inspection. Plus, they tasted good with a fruit-leather texture. In the end, this recipe gave both an amazing visual but also delivered on taste.

Wednesday, March 3, 2010

Immune Cell Cupcakes

This post will be brief in that it is more about making a treat look good than it is about the actual cooking.


Last week one of my classmates took her prelim, the exam that determines if you are a tried-and-true PhD candidate. She works on immunology, so a friend and I decided to make her some sciency cupcakes. The cakes themselves are Pillsbury Funfetti and the frosting is a basic buttercream with some lemon extract mixed in. After choosing our designs and colors, we went to town. We made T-cells, B-cells, follicular dendritic cells (the giant octopus-thing above), antibodies, and even a little mouse cartoon. I mostly wanted to share this picture because it shows that with a little thought you can impress your friends and family with simple pandering to their tastes. Mom will love a cake with her favorite flowers on it, even if they are a little roughly (read "rustically") done.

Frozen Greek Yogurt

Greek yogurt is the latest craze to happen to yogurt since fruit-on-the-bottom. It's not for the faint of heart. It's not sweetened up like American yogurts. It's tangy, but thick and luscious. What better base to use to make real frozen yogurt?

Frozen Greek Yogurt
Adapted from Gourmet Magazine. Yields 1 quart.

Ingredients
1 cup sugar
1/2 cup light corn syrup
1/4 cup water
1/8 tsp salt
2 cup Greek yogurt (2% fat)
1 cup buttermilk
5 tsp lemon juice

Directions
Warm the first four ingredients in a small saucepan over low heat, stirring, until sugar has dissolved. Transfer to a large bowl to cool to room temperature, stirring occasionally (or else a film will form on top).

Whisk in remaining ingredients and chill in the refrigerator until very cold, at least 3 hours.

Freeze yogurt in ice cream maker according to manufacturer's instructions. Transfer to airtight container and put in freezer to firm up.

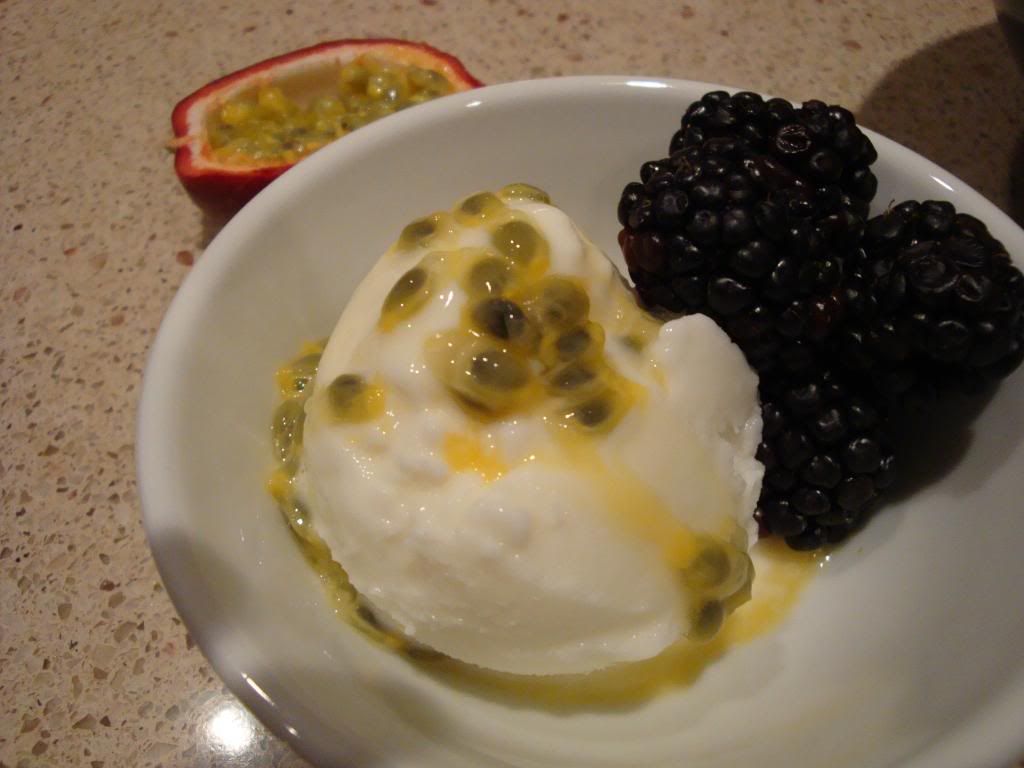
When serving, top with your choice of toppings. I used passionfruit and blackberries, but honey, strawberry jam, chocolate chips, sprinkles, etc. all would work just as well.


Frozen yogurt, like yogurt, has seen a new wave of innovation. All of a sudden, shops are appearing that are not serving frozen yogurt the ice cream substitute, but rather they are serving yogurt-based ice cream. I don't know how we ever lived on icy and flavorless frozen yogurt before this new creation came on the scene. Now you can make your own at home and enjoy the creamy tang. This version is a little sweeter than just straight yogurt, so even those who have not taken to Greek yogurt will enjoy this frozen treat. And if you don't, just douse it in chocolate sauce and still feel proud that you are getting a healthy(er) serving of dairy.

Mojo Pork with Plantains

Ever have one of those recipes where everything seems to go just perfectly? Well I found one in Food Network Magazine.


Mojo Pork Chops with Plantains
Yields 4 servings

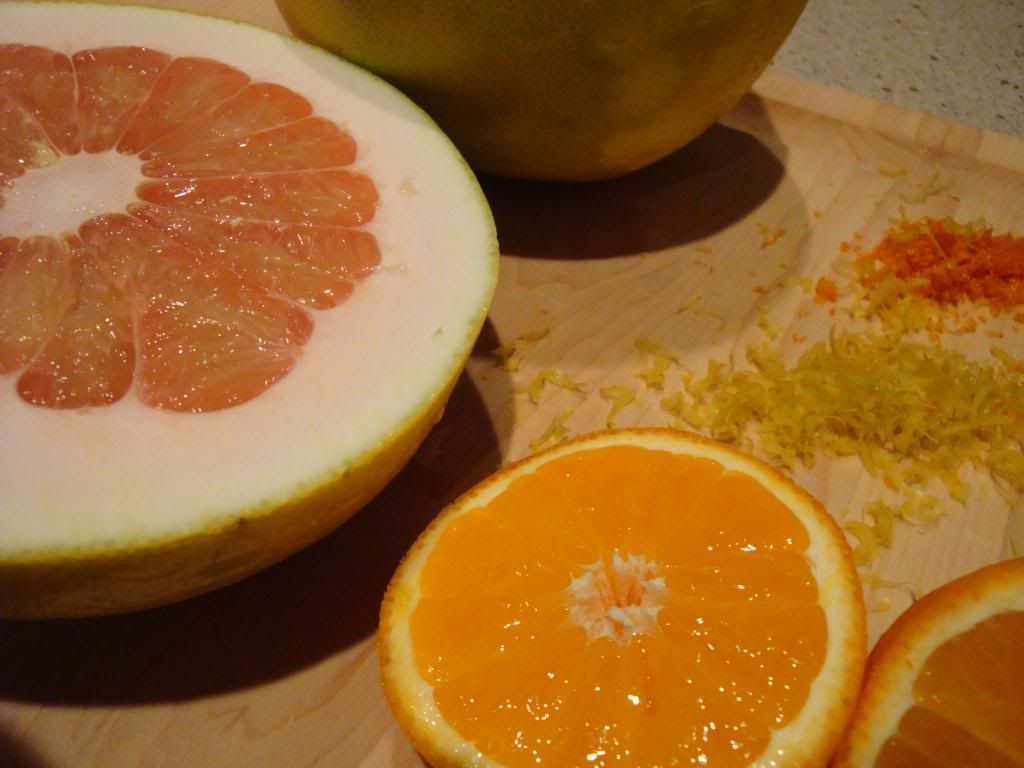
Mix the juice of one orange and half of a grapefruit (I used the pomelo seen above because it's like a sweet grapefruit) with olive oil, white wine vinegar, oregano, cumin, salt and pepper. Immerse the pork chops in this mixture and let them marinate (I let them go for about an hour).

To make the mojo, juice another orange and the other half of the grapefruit and mix in the zests of your citrus, more vinegar, olive oil, oregano, garlic, and freshly chopped parsley.

Boil three skinned and quartered plantains in salted water until they are tender. Drain them and mash with some of the cooking liquid and olive oil. Season with salt and pepper.

Pat pork dry and cook in a skillet over medium-high heat until they are golden on both sides. To plate, drizzle mojo on pork and add the side of mashed plantains.


The marinade tasted just okay when I made it. But after it sat for a little bit and was drizzled on the warm pork, the flavors came to life. The citrus and oregano and garlic stood out and zinged my tongue. I thought using plantains more or less like potatoes to make the plantain mash was just genius. Plantains have that inherent sweetness, even when they are still yellow, that keeps your tongue interested and wanting more. I would make this dish again in a heartbeat, especially if you want to wow someone with your culinary prowess without spending hours in the kitchen.