Showing posts with label Chocolate. Show all posts

Sunday, October 24, 2010

Buried Cherry Cookies

There's nothing like food containing a surprise. Savory items can hold surprises, like a Scotch egg (sausage stuffed with a boiled egg) or a turducken (turkey stuffed with a duck stuffed with a chicken stuffed with stuffing). Chocolate truffles and cupcakes are the more common confections in which you can hide a little surprise. And what better gift to send someone for their birthday than a delicious treat with something hiding inside.

Buried Cherry Cookies
Makes 42 cookies. From Better Homes & Gardens Cookbook.

Ingredients
10 oz maraschino cherries
1/2 cup unsalted butter, softened
1 cup sugar
1/4 tsp baking powder
1/4 tsp baking soda
1/4 tsp salt
1 egg
1.5 tsp vanilla extract
1/2 cup unsweetened cocoa powder
1.5 cups flour
1 cup semisweet chocolate chips
1/2 cup sweetened condensed milk

Directions
Drain cherries and reserve juice. Halve any large cherries, but leave the rest intact. Beat butter in a standing mixer on medium speed for 30 seconds. Add the sugar, baking powder, baking soda, and 1/4 tsp salt. Beat until combined, scraping sides of bowl if necessary. Beat in egg and vanilla until combined. Beat in cocoa powder and flour until just incorporated.

Technically a Thumbprint Cookie

Shape dough into 1" balls. Place dough balls about 2" apart on an ungreased cookie sheet. Press your thumb into the center of each ball and place a cherry in each center.

Loading Up the Cookies

For the frosting, combine chocolate chips and sweetened condensed milk in a small saucepan. Cook, stirring constantly, over low heat until chocolate melts. Stir in 4 tsp of the reserved cherry juice. Spoon 1 tsp frosting over each cherry, spreading to cover the cherry entirely.

Bake in a 350 degree F oven for about 10 minutes or just until edges are firm. Cook on cookie sheet for one minute, then transfer to a wire rack and allow to cool completely.

Buried Cherry Cookies

These cookies are an excellent addition to anyone's repertoire and look great on a holiday cookie plate. They are also a delight to make and wonderful to eat. Not only does the fudgy frosting have a light cherry flavor, but then *wham* you bite right into the maraschino cherry surprise in the middle. Don't listen to your parents - go ahead and play with your food.

Peanut Butter-Filled Chocolate Cupcakes

I love cupcakes. The idea itself is genius. I would like a piece of cake that I can eat with my hands. Wherever, whenever. With a cupcake you are one paper wrapper away from a small indulgence. So, for the hell of it, I decided to open up one of my cupcake books and give this recipe a whirl (or rather, a swirl).

Peanut Butter-Filled Chocolate Cupcakes
Makes 12 cupcakes. From Martha Stewart's Cupcakes

Ingredients
Cupcakes
2/3 cup flour
1/2 tsp baking powder
1/4 tsp salt
1/2 cup unsalted butter, cut into small pieces
4 oz semisweet chocolate, coarsely chopped
2 oz unsweetened chocolate, coarsely chopped
3/4 cup sugar
3 large eggs
2 tsp vanilla extract

Peanut Butter Filling
4 tbsp unsalted butter, melted
1/2 cup powdered sugar, sifted
3/4 cup smooth peanut butter
1/4 tsp salt
1/2 tsp vanilla extract

Directions
Preheat oven to 325 degrees F. Line a muffin tin with paper liners. Whisk together flour, baking powder and salt. Put butter and chocolates in a heatproof bowl of a double boiler; stir until melted. Alternatively, microwave butter and chocolates in 10-15 second bursts, stirring in between, until melted. Cool slightly.

Whisk sugar into the chocolate mixture. Add eggs and whisk until mixture is smooth. Stir in vanilla. Add flour mixture and stir just until incorporated.

Swirling the Cupcakes

Prepare peanut butter filling by stirring together all ingredients until smooth. Spoon 2 tbsp chocolate batter into each paper liner, followed by 1 tbsp peanut butter filling. Repeat with another tbsp chocolate batter, and top with 1 tsp filling. Swirl top of cupcake batter and filling with a toothpick.

Bake until a cake tester inserted comes out clean, about 30-40 minutes. Transfer tin to a wire rack to cool completely.

PB-Filled Chocolate Cupcakes

There are two keys to making this recipe work. Firstly, remember that this is a chocolate cupcake filled with peanut butter, not a swirl cupcake. The difference is not much, but the peanut butter filling will not bake into a cake texture. Instead it stays pretty separate from the chocolate cake. Secondly, the directions are written in a very exacting Martha Stewart style. But if you follow them, you'll end up with a tasty end-product. If you're going to indulge, then chocolate and peanut butter is a great way to do it. While chocolate is always a good thing, adding peanut butter makes these cupcakes more sumptuous and rich. You may be glad you only have this mini-cake to eat per serving, because a full-sized cake of this sort would be a meal unto itself.

Thursday, October 21, 2010

NC State Fair 2010

State Fair Menu

It's time for the North Carolina State Fair! Between the State Fair and the Renaissance Fair, fall is one of the best times of the year. Once the weather breaks and the sweltering heat stops, it's time to eat to your heart's content, hit the rides until you feel sick, win some prizes, then start all over again. The newest feature at the website is that you can search for any of the rides/games/food that you want. That way you can build a map of all the places you want to go on your visit. If you are iPhone-inclined, they also have an app for that. Here are my favorite food finds from this year's fair:

Roasted Corn

We started the day light with an ear of roasted corn. The ears are roasted en masse until the husk is charred. They are served up plain or dipped in melted butter. Then you have your choice of various toppings, including but not limited to salt, pepper, lemon-pepper, poultry seasoning, Parmesan cheese, and mayonnaise. The corn tastes great and it may be one of the healthiest items you find at the fair, certainly the only one that came directly off a plant.

Chocolate-covered Bacon

Chocolate-covered bacon was a big hit at last year's fair and it is back and as good as ever. The bacon itself is crisp and salty-sweet. It is dipped in a thick layer of good chocolate, then topped with sprinkles or other decorations. It is a little expensive for a single piece of bacon, but you won't be complaining once you bite through the chocolate shell. Just be sure to get your bacon from Steph's Strawberries as some of the other versions fall short on Steph's level of quality.

Attack of the Giant Gummies!

GGB of Raleigh has their first stand at the fair, selling the world's largest gummies. They are famous for their 5lb gummy bears and now offer a variety of other treats including a 3lb gummy worm that is about 2 feet long, gummy shot glasses, gummy tongues, and smaller 1lb gummy bears on sticks that come in about 10 flavors. Unfortunately, my stomach did not let me try these intriguing confections, but if you can find some friends to share, this would be a great novelty.

Koolaid Pickles

One of the most intriguing new offerings at this year's fair are Koolaid pickles. Before you gag at the thought, hear me out. The vendors take a jar of Mt. Olive bread'n'butter pickles, dump out the brine, and put in some red Koolaid. The outside of the pickles is a bright red color, but the interior of the pickle is that same odd shade of green. I've never been a fan of bread'n'butter pickles, but this version was actually quite tasty. The Koolaid sweetened the pickles up just a tad and made their flavor more interesting. If you're feeling adventurous (which you should be at the fair), buy a set of these pickles and see what you think. If all else fails, you can just throw them at one of the game stalls and see if you win a prize.

Fried Food Fest

State Fairs from Texas to North Carolina are known for bringing the best and worst in fried foods. The Lone Star State takes the cake (or Twinkie) when it comes to fried food. Vendors compete for the best new fried food, inventing such odd offerings as fried Coca Cola, fried beer, and even fried butter. Many of these new ideas get to the NC State Fair, and the popular ones like fried Oreos become permanent parts of the menu.

Chocolate Obsession Funnel Cake

Can a funnel cake be gourmet? Yes, yes it can. Funnel cakes have long been part of fairs. A batter is streamed into fry oil and allowed to cook until a puffed nest forms. Some vendors top them with a thick layer of powdered sugar. But the newest addition to this lineage is the gourmet funnel cake, coming in 6 flavors like apple and chocolate obsession (pictured above), which is a chocolate funnel cake topped with chocolate syrup, chocolate chips, powdered sugar, and whipped cream. It is truly decadent and very difficult to stop eating. One drawback of most funnel cakes is that after a few bites you're pretty much tired of the taste of fried batter, but these gourmet cakes keep you wanting more even after you've cleaned your paper plate.

Fried Chips Ahoy and Honeybun

The newest of the things-you-thought-they-would-never-fry category are the fried Chips Ahoy and the fried Honeybun. The Chips Ahoy, much like the fried Oreo, becomes much softer in the fryer, but it brings a lot less flavor than that chocolate cookie. All you end up with is a piece of fried batter surrounding some chocolate chips. The Honeybun, on the other hand, was marvelous. There is a lot of fried batter to get through with it, so it is best to split this behemoth. The Honeybun is heated in the frying process, making it taste absolutely delicious and wonderfully moist.

Krispie Kreme Bacon Cheeseburger

The last new item that is definitely worth mentioning was by far my favorite food at this year's fair. It is the *brace yourself* Krispie Kreme Bacon Cheeseburger. If it sounds gross, wait for it. Burger + bacon + random unnecessary toppings + cheese + 2 Krispie Kreme donuts = pure bliss. If you've ever had a McGriddle from McDonald's, this monster is very similar. It is mostly sweet with a bit of savory in the middle from the burger and cheese. The bacon unites it all (because let's face it, bacon is magical and can bring people together). Like many foods at the fair, I split this with a group of people, but this was the only food I was sad that I could only eat my share and not the entire thing. This burger was transcendentally wonderful and if you can't get to the fair to have one this year, you should make it at home.

The fair, overall, was a monumental success. Not only am I still an ace at the water-shooting games, but I went home feeling fully satisfied that I had eaten the best of this year's fair. If you live in the area and have time between now and Sunday, go to the fairgrounds. It does not matter if there are throngs of people. All that matters is that you have the chance to enjoy this unique slice of the American lifestyle.

Saturday, September 11, 2010

Banana-Walnut Chocolate Chip Cookies

Banana bread is one of my kitchen staples. Give me 2-3 ripe bananas and 1 hour, and I can make you a phenomenal banana bread. But what if you wanted something more hand-held? Something that you did not have to slice. Something that can be divvied up with ease. Sounds to me like banana bread in cookie form.

Banana-Walnut Chocolate Chip Cookies
Adapted from Martha Stewart's Cookies.

Ingredients
1 cup flour
1/2 cup whole wheat flour
1 tsp kosher salt
1/2 tsp baking soda
3/4 cup unsalted butter, softened
1/2 cup sugar
1/2 cup light brown sugar
1 large egg
1.5 tsp vanilla extract
1 large, very ripe banana, mashed
1 cup rolled oats
8 oz semisweet chocolate chips
1/2 cup walnuts, coarsely chopped and toasted

Directions
Preheat oven to 375 degrees. Line baking sheets with parchment or spray with cooking spray. In a medium bowl, whisk together flours, salt and baking soda.

In a large bowl, beat butter and sugars with a mixer on medium speed until pale and fluffy. Reduce speed to low and add egg and vanilla; mix until combined. Mix in banana. Add flour mixture; mix just until combined. Stir in oats, chocolate chips and walnuts.

Drop dough by heaping tablespoons onto prepared baking sheets, keeping cookies about 2 inches apart. Bake until golden brown and just set, 12-13 minutes. Let cool on sheets on wire rack for 5 minutes. Transfer cookies to a wire rack and allow to cool completely.

Banana-Walnut Chocolate Chip Cookies

Martha's awesome ingenuity has yielded the perfect taste of banana bread and chocolate chip cookie. These treats really are great by themselves and don't need any sort of toppings or sauces to make them better. If anything, you may want to serve them sandwiched around some vanilla ice cream. You know, just to cut the sweetness.

Chocolate Butterscotch Cake

After making many free-standing cakes this year, I needed a break. If you want to make a tasty, good-looking cake, it can take quite a while. At the very least, you spend a couple hours spread out over a few days. But I wanted to break free of my rut and do something easy but delicious. I was charged with making a cake for a true Southern boy, so who better to turn to than Paula Deen?

Chocolate Butterscotch Cake
From Paula Deen. Yields 12 servings.

Ingredients
3/4 cup softened butter
1.5 cups sugar
2 large eggs
1 tsp vanilla extract
2 cups flour
3/4 cup cocoa powder
1 tsp baking soda
1/4 tsp salt
1.5 cups milk
12.5 oz butterscotch
12 oz whipped topping, thawed
3.5 oz butterscotch pudding mix

Directions
Preheat oven to 350 degrees. Grease and flour a 13x9" baking pan.

In a large bowl, beat butter and sugar on medium speed until creamy. Add eggs, one at a time, beating well after each addition. Beat in vanilla and set aside. In a medium bowl, combine flour, cocoa, baking soda, and salt. Gradually add this to the butter mixture, alternatively with milk, beginning and ending with flour. Spoon into prepared pan.

Chocolate Cake Base

Bake the cake for 25 minutes or until a toothpick comes out clean.

Poked Full o' Holes

While the cake is still warm and using the handle of a wooden spoon, poke holes halfway through the cake at 1/2" intervals.

Covered in Butterscotch

Pour butterscotch evenly over the cake and allow to cool completely.

Soaked In

After cake has cooled, combine the whipped topping and pudding mix in a medium bowl. Spread evenly over the cooled cake. Be sure to make this frosting right before you use it and don't worry if it tastes gritty. The pudding will set up in the whipped topping gradually over time. This makes it taste better, but it also makes it more difficult to spread once it has started to set up. Cover the cake and refrigerate it. When ready to serve, cut it into squares. Don't forget an insulin shot as a chaser.

For as simple and saccharine as this cake sounds, everyone loved it. The birthday boy even took home the remainder over the weekend and had to bring my baking pan back to me. The butterscotch keeps the cake lusciously moist and complements the chocolate very well. The additional butterscotch on top with a creamier base is actually a nice relief from the intense flavor and sweetness from the cake. I'm always amazed to see what types of desserts come out of a Southern kitchen. I really shouldn't be surprised that everything is so sweet since any baby south of the Mason-Dixon line is raised on sweet tea instead of formula. And let's face it, no one does a killer, simple dessert like Paula.

Thursday, September 2, 2010

Smith Island Cake

I don't know if you realize this, but people love cake. Cake tastes good by itself, with some frosting, fruit, chocolate, pudding, bacon, whatever. I love cake too. I love to make it for other people. In every flavor, shape and size. My latest creation comes straight out of the pages of Cook's Country Magazine, but it's the pictures that really speak for themselves.

Smith Island Cake
Yellow cake recipe from Epicurious, cake recipe from Cook's Country Magazine; serves 8-10.

Ingredients
Yellow Cake
3 cups cake flour
1 tbsp baking powder
1/2 tsp salt
1 cup unsalted butter, softened
2 cups sugar
5 large eggs
2 tsp vanilla extract
1.25 cups buttermilk

Frosting
10 oz bittersweet chocolate, chopped
1 cup heavy cream
1 cup sugar
1/4 tsp salt
1 tsp vanilla extract
1/2 cup unsalted butter, softened

Directions
Frosting
Place chocolate in large bowl. Heat cream, sugar and salt in a small saucepan over medium-low heat until sugar dissolves and mixture begins to simmer. Pour cream mixture over chocolate and whisk until smooth. Whisk in vanilla and butter until glossy. Cover and refrigerate until firm, but spreadable, about 1 hour.

Yellow Cake
In a medium bowl, sift flour, baking powder and salt. Set aside

Beat 1 cup butter with an electric mixer on medium-high for 3 minutes until light in color. Add the sugar, 1/4 cup at a time, beating 1 minute after each addition. Add eggs, one at at time, beating well between additions. Reduce mixer speed. Stir vanilla into the buttermilk. Add flour mixture and buttermilk mixture alternatively beginning and ending with flour. Mix just until incorporated.

Yellow Cake Batter

Preheat oven to 350 degrees F. Grease and flour two 8" cake pans (or more if you have them), and line them with parchment paper. Spoon about 2/3 cup of yellow cake batter into prepared pans.

Yellow Cakes Before Baking

Spread batter evenly in pan. Bake until edges are golden and cake springs back when touched, 10-14 minutes. Cool pans on rack for 5 minutes. Run a knife around the edge of the pan, then invert cakes onto rack to finish cooling. Cool pan to room temperature, then wipe clean and repeat the process to make a total of eight thin cake layers.

To Assemble

Stack o' Cakes

I froze my cake layers for a couple of days and they did perfectly well. If you do want to make these ahead, be sure they are separated from each other with plastic wrap. Otherwise they may stick together.

Frosting First Layer

Place one cake layer on a serving platter. Spread 1/4 cup frosting over the cake. Be sure to spread the frosting as evenly as possible, taking it to the edge of the cake.

Layers Stacked

Top this layer with another layer of cake and repeat the process until there are 8 cake layers, all with a thin layer of chocolate frosting between them.

Smith Island Cake

Use the remaining frosting to cover the top and sides of the cake. Serve.

Cake, Sliced Open

The many layers are the real show-stopper with this cake. People marvel at your skill to pull off such an intricate looking cake. Even if your cake is domed on top and does not have the smoothest frosting, you will still wow a crowd.

Smith Island Cake Slice

Furthermore, this cake tasted great. With all of those layers of cake and frosting, one would think this would be too sweet, but the layers meld together more to make each bite delicious. People who like to eat the cake and frosting separately may have problems with this cake, but everyone I know that tried it liked it.

Here's some food for thought: there are many examples of cakes that take layering to the extreme. Maybe this is some sort of convergent evolution. The other cakes that come to mind include crepe cakes (20 or so crepes with delicious fillings in between) and doberge cakes (filled with pudding). In fact, according to Wikipedia, it seems that every country has their own name and possible spin on this idea with cakes and pastries. The French mille-feuille ("thousand leaves") layers puff pastry and pastry cream with fancy chocolate stripes on top. Add some almond flavoring and it is a napoleon, named more for the city of Naples than the diminutive French emperor (not Sarkozy). Give it more Italian flair and it is mille foglie, which can have some sponge cake thrown in. From all of these, it seems that more layers means more work, which means greater to detail and a higher-end cake overall. Who knew that Smith Island, Maryland, was so worldly?

Saturday, August 21, 2010

The Treats Truck - NYC

While the food truck business has been booming in Durham this past year, the idea started in cities like New York. One truck we tracked down is The Treats Truck. Having seen the truck on TV, we knew we wanted to find it in real life.

The Treats Truck

The truck publishes its tentative locations and times on its website, so it's generally pretty easy to track down. The desserts we were most excited about were the dessert brownies (cookies covered in chocolate, brownies and various other toppings) and the ice cream cone cupcake (cupcake placed into a sugar cone). When we arrived and had the full menu at our disposal, though, it was hard to decide. Some free samples of wonderful raspberry brownies did not help and neither did the plexiglass window offering a view of all the baked goods to be had.

Cran Almond Crispy Square

The first treat we selected was a cranberry-almond crispy square. It was literally a hunk of a cereal treat that was made for adult tastes by the addition of dried berries and nuts. Simply wonderful.

Treat Truck Cookies

On the left in the above picture are two peanut butter cookies sandwiched around chocolate filling. They were everything a PB cookie should be - crumbly, buttery, nutty, sweet. The chocolate did not hurt either. Lastly, I chose an oatmeal cookie made into a large thumbprint with a dollop of apricot jam. The cookie was good and the jam brightened its flavor to make for a sumptuous whole.

The owner, Kim Ima, was kind, gracious and pleasant to talk to, especially by New York standards. When she found out that we were from out-of-state, she made sure to recommend some places in the city we should visit. While there are fleets of food trucks from which to eat, the Treats Truck should be one you find for a nice afternoon pick-me-up in the city.

Thursday, August 19, 2010

Magnolia Bakery - NYC

GPS is a wonderful invention. Especially now that with a decent smart phone (and a good cell signal), you can make your way around any city with ease. That is how we managed on our recent trip to New York City. One benefit of this technology, as we discovered, is that it can help you discover places that you did not know were there. That is how we stumbled across one of the Magnolia Bakery storefronts while meandering on Bleecker Street.

Over the past 14 years, the Magnolia Bakery has become a New York institution. Some credit the cupcake's recent rise in popularity to this bakery. Walking into the store, they have a "self-serve" section just for their cupcakes.

Magnolia Bakery Cupcakes

You can find all sorts of varieties including, but not limited to, chocolate, vanilla, red velvet, and lemon. The frostings appear in a range of colors with the very interesting decoration style that almost makes the cupcakes appear like they have nests on top. Some festive white sugar orbs finish off the cakes to give them a sophisticated but playful look.

Magic Cookie Bar

We, however, opted to buy some goodies out of the huge display cases. We ordered a refreshing, unsweetened, raspberry iced tea to sip on while we perused the dozens of cakes, cookies and other goodies. The banana pudding and hummingbird cake looked incredible, but I wanted something smaller. The first item I chose was the magic cookie bar. On top of a graham cracker crust sits a dense combination of coconut, nuts and chocolate chips. The cookie bar was definitely sweet, but not cloyingly so, which is often a flaw in this type of treat. It was very delicious and I made short work of it.

Red Velvet Cheesecake

By far, my favorite dessert was the most surprising - red velvet cheesecake. Somehow, the bakers have infused a light, creamy (likely no-bake) cheesecake base with the earthy chocolate flavor and ruby red of the Southern classic. This cheesecake tasted just like the original cake and it did not feel immensely heavy. It sat atop a thick Oreo cookie crust to give it some extra chocolate crunch. A dollop of whipped cream and some chocolate shavings on top made the cheesecake look especially appealing.

Not only did my phone help me find this incredible bakery by total happenstance, but I was able to see that they are great at more than just cupcakes. You can see evidence of this in the park across the street where patrons sit beneath the trees to enjoy their various sugary treats. Though if I lived in the city, I'm sure a dozen cupcakes would follow me home whenever I stopped by.

Sunday, May 23, 2010

White Chocolate Strawberries

One of the classic and elegant ways of preparing strawberries is to simply dip them in chocolate. In fact, I don't believe I've ever had a chocolate-berry combination that I did not like. And another of my goals for this season's haul was to make my own chocolate-dipped strawberries. Had I known this was so easy and tasty, I would have been doing this myself years ago.

White Chocolate Strawberries

White Chocolate Strawberries with a Twist
From Bon Appetit, makes 16

Ingredients
2 tbsp sugar
1/2 tsp orange zest, chopped
1/2 tsp lemon zest, chopped
6 oz white chocolate, chopped
16 large, ripe strawberries

Directions
Line a baking sheet with foil or a silicone mat. Using fingers, mix sugar and citrus zests in a small bowl until well mixed. Be sure to chop the zest, otherwise you'll end up with larger globs of this citrus sugar that aren't as appealing to the eye.

Melt chocolate either over a double boiler (in a glass bowl set over a saucepan of simmering water) or in short bursts in the microwave. Stir to be sure it is smooth.

Hold strawberry by its leaves and dip into chocolate. Allow excess to fall off the berry. Turn berry pointed-end-up and sprinkle with the citrus sugar. Place on baking sheet. Repeat with remaining berries. Chill in the fridge until the chocolate sets (room temperature just doesn't do the trick).

The best part about these berries is that the citrus really livens the flavor of the berry. I've come to appreciate that when pairing strawberries with other flavors, it is a good idea to play off of their bright zestiness. Champagne pairs well because of the effervescence. Citrus flavors, particularly lime and orange, go very well with berries too. A balsamic vinegar-based sauce is also an excellent option. In this recipe, the white chocolate (a more subdued chocolate since it is more vanilla than cocoa) provides a nice base for the citrus, both in structure and in taste. The citrus is more subdued than I originally thought, so it does not overwhelm the senses and allows the chocolate and the berries to shine through. If you're not in the mood to bake a dessert, these berries are a quick crowd-pleaser.

Sunday, May 9, 2010

Chocolate-Mango Whoopie Pies

Mangoes are in season right now and they are life-changingly good. I was slicing one the other day and one taste sent me into a frenzy. Before I knew it the flesh was gone and I was gnawing on the pit. I went out and bought a whole slew of mangoes and, while I was elbow deep in one, I thought to myself, "What else could I do with one of these beauties?" One idea came to mind: whoopie pies!

Chocolate-Mango Whoopie Pies
Adapted from 13 Bakery, makes about 12 pies
Cakes
1.75 cups flour
3/4 cup cocoa powder
1.5 tsp baking soda
1/2 tsp salt
1/2 cup butter, softened
1/2 cup sugar
1/2 cup brown sugar
1 cup milk
1 egg
1 tsp vanilla extract
Filling
1 mango, peeled, diced
1 tbsp grated ginger
1 tbsp sugar
1/2 cup butter, softened
8 oz cream cheese, softened
1 tsp vanilla
3 cup powdered sugar

Preheat oven to 375 degrees and cover a cookie sheet with parchment paper or a silicone mat. Whisk together flour, cocoa powder, baking soda, and salt.
In medium bowl, cream together butter and sugar until light and fluffy, about 2 minutes. Add the egg and beat to combine. Beat in milk and vanilla. Beat in flour mixture just until combined.

Using an ice cream scoop, drop mounds of batter onto cookie sheet. Try to keep the mounds as round and even as you can because the pie halves will retain whatever shape you give them at this point. In other words, if you make ugly mounds, you'll get ugly pies. Bake 8-12 minutes until top springs back when touched. Cool completely on wire rack.

For the filling, start by cooking the mango in a saucepan over medium heat. Add grated ginger and sugar and cook mixture until the mango is soft. Cool completely. Beat the butter and cream cheese until well combined and fluffy. Add in vanilla and mango mixture and beat until combined. Gradually beat in powdered sugar until mixture is smooth. Feel free to add more powdered sugar if you want a stiffer filling.

To assemble the pies, spread a large dollop of the filling on the bottom of one of the pie halves. Then affix another pie half on top of this (the round sides should both be facing out). I'll leave the quantity of filling to be used up to you since some people like theirs oozing over the sides while others prefer a more modest amount.

Chocolate-Mango Whoopie Pies

These pies were very good. The chocolate in some respects overwhelmed the mango in the middle, but mango definitely made its presence known. Perhaps some sort of ginger or spice cake on the outside may be better next time, but chocolate is the classic flavor. Plus, everyone loved these whoopie pies. They did not quite elicit the yells of "Whoopie!" like the story of this dessert's Amish roots, but that may be because everyone had their mouth full.

Saturday, March 27, 2010

Guinness Chocolate Cupcakes

This update is a little slow in coming, but I was proud of the results so here's my contribution to the St. Patrick's Day festivities: Guinness chocolate cupcakes with Bailey's Irish cream frosting.

Guinness Chocolate Cupcake

I have wanted to use Guinness in a baking recipe for a couple of years, so when I saw this post from Le Petit Pierogi, I knew I had found my opportunity. She gives a good recipe on her page, so I won't bother to copy it here.

Christmas

For decorating, I must first ask a holiday riddle: what is Christmas without the red?

St. Paddy's Day

The answer is St. Patrick's Day! I received some Christmas-themed sprinkles around the holidays and I thought I could repurpose them. I plucked out the red sprinkles to make a topping appropriate for this holiday.

Guinness Cupcakes

The beer flavor mostly cooked out of the cupcakes. A couple people claimed they could taste it a bit, but for the most part the Guinness just accentuated the chocolate and kept the cakes moist. The frosting was a little more alcoholic. Even though only a few tablespoons of Irish cream go into the buttercream, the flavor is pretty intense. The pairing of chocolate and Irish cream, though, is marvelous. These little treats disappeared pretty quickly among my green-clad colleagues. So the next time you have a leftover stout, go ahead and throw it into a cake for a new Irish experience.

Tuesday, February 9, 2010

Nutella Cake

Last week, we celebrated another birthday in my lab. When I was pondering, I came up with the idea to make a Nutella cake. Little did I know this would fit right in with World Nutella Day. It seems my finger is always on the pulse of the culinary community, even when I don't know it.


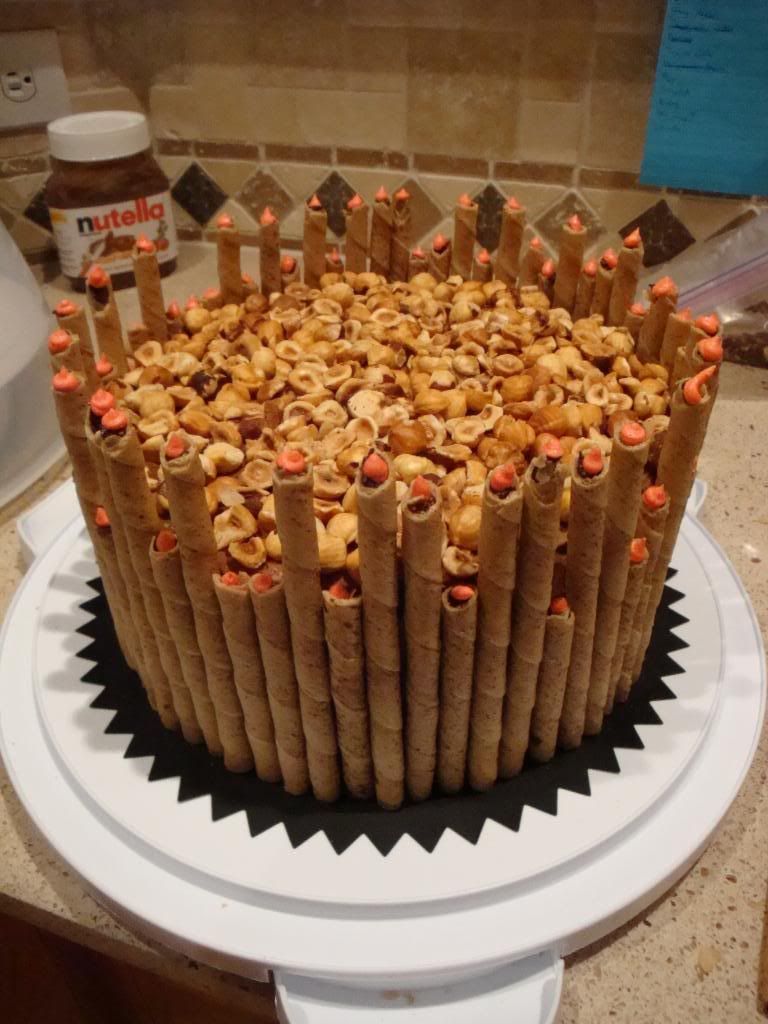
I drew inspiration for the outside of the cake from Rose Levy Beranbaum's book Rose's Heavenly Cakes, specifically her "chocolate tomato cake." The cake is surrounded by Pirouette cookies of varying heights. Each of these cookies is topped by a small dollop of red frosting to act as little candles. If you want to make this cake for an age-conscious birthday person, please note that I had to use 67 cookies to completely surround the cake.


The inside of the cake, however, was my own creation. I used my basic chocolate cake recipe. This cake normally uses 1.5 cups of coffee to accentuate and darken the chocolate flavor, but I substituted one-third of that with Frangelico, a hazelnut liqueur. As a third surprise layer, I baked my traditional banana bread recipe in a round cake pan. The banana bread stays wonderfully moist and I may use it to make a full cake one day.


So far, this cake is not very Nutella-y. That's where the frosting comes in to bind it all together, both in construction and in flavor. I mixed together 1 cup of Nutella with 3 cups of powdered sugar and 2 tablespoons of milk to produce just enough frosting to cover this 3-layer, 9-inch cake. On top of all this, I placed some toasted, chopped hazelnuts. The result is a behemoth cake that astounded everyone. I have a hard time deciding if it had too many elements or just enough to make it a really good cake. All of the flavors blended together beautifully to produce a cake that will be tough to beat for the next birthday.

Tuesday, January 5, 2010

Chocolate Peppermint Cookies

Every year when I go home for Christmas, I'm asked to make a batch of chocolate chip cookies. After doing this for the past 7 years or so, it gets a little boring making the same cookies the same way, year after year. I do love tweaking recipes, though. While I am still required to make the classic cookies, I am free to innovate as I so choose. This year, I was struck with the idea for making chocolate peppermint cookies.

Original Nestle Toll House Chocolate Chip Cookies
Yields 60 cookies

Ingredients
2.25 cups flour
1 tsp baking soda
1 tsp salt
1 cup unsalted butter, softened
3/4 cup sugar
3/4 cup brown sugar
1 tsp vanilla extract
2 large eggs
2 cups chocolate chips
1 cup nuts, chopped (optional)

Directions
Preheat oven to 375 degrees F.

Combine flour, baking soda and salt in small bowl. Beat butter, sugars and vanilla extract in large bowl until creamy. Add eggs, one at a time, beating well after each addition. Gradually beat in flour mixture. Stir in chocolate chips and nuts. Drop by rounded tablespoons onto ungreased baking sheets.

Cookie Dough

Bake for 9-11 minutes or until golden brown. Cool on baking sheets for 2 minutes.

Baked Cookies

Remove to wire racks (or paper towels) to cool completely.

Cooling Cookies

For chocolate peppermint variation, replace 3/4 cup of the flour with unsweetened cocoa powder and replace chopped nuts with crushed peppermint candies. I used the peppermint sticks because they are softer and melt more easily as you eat them. You can also substitute peppermint extract for the vanilla extract if you want more of a permeating minty flavor, but I left that out so the mint was more subtle.

Chocolate Peppermint Cookies

The Nestle Toll House recipe is an American classic. It is incredibly easy, though that has not stopped Nestle from making break-n-bake cookie dough. Embellishing your own version is also quite simple. Add your own blend of spices or mix-ins to make a cookie you can call your own. And the result will nearly always be delicious.

Tuesday, December 29, 2009

Chocolate Mousse Cake

Chocolate Mousse Cake

My coworkers have made it abundantly clear that they love chocolate. I've made a number of different cakes for them and the chocolate ones always receive rave reviews (after a bit of silent savoring). So for our December birthdays I thought I would pull out all the stops: chocolate mousse cake. Chocolate cake filled with chocolate mousse and topped with straight-up chocolate. Talk about a chocolate-lover's dream...

Chocolate Mousse Cake
Ingredients
Mousse
1 package gelatin
3T cold water
1/4 cup boiling water
1 cup sugar
1/2 cup cocoa powder
3 cup heavy whipping cream
Cake
2 cup flour
2 cup sugar
3/4 cup cocoa powder
1.5 tsp baking powder
1.5 tsp baking soda
3/4 tsp salt
1 cup milk
1 cup brewed coffee
3/4 cup vegetable shortening
2 eggs
1 block of bittersweet chocolate

Instructions
Mousse
1. Combine gelatin and cold water in a small bowl. Let it stand for about 2 minutes, then pour in boiling water. Stir mixture until gelatin dissolves. Set gelatin mixture aside.
2. In another small bowl, combine sugar and cocoa powder.
3. Beat cream in a standing mixer until it becomes foamy. Gradually add sugar-cocoa mixture. Beat until the soft peak stage. Thoroughly beat in gelatin mixture, but do not overbeat the cream. Cover and chill the mousse for at least 4 hours.

Cake
1. Preheat oven to 350 degrees. Grease two 9" round cake pans and line bottom with a round of parchment. In a large bowl, combine flour, sugar, cocoa powder, baking powder, baking soda, and salt. Add milk, brewed coffee, vegetable oil, and eggs, beating mixture until smooth.
2. Split mixture between two prepared cake pans. Bake for 20-25 minutes until a wooden toothpick comes out clean. Let cool for 10 minutes, then remove from pans and let cool completely, about 1 hour.

Assemble Cake
1. With a serrated knife, cut off the top of one cake so it is level. Place this layer, cut side up, on a serving plate. Spread half of mousse over this layer (perhaps less, depending on how moussey you want it). Carefully place remaining cake layer on top of the first layer. Spread the remaining mousse around the top.
2. Microwave block of chocolate in 5 second bursts at half power until soft but not melted, about 15 seconds. Using a vegetable peeler along the edge of the block, make chocolate curls and shavings.
3. Top cake with chocolate curls. Refrigerate cake until serving.

Chocolate Mousse Cake

Chocolate Mousse Cake

Cake Pops

The following is the tragic story of a tasty, imaginative treat. The setting: end of the semester. The protagonist: cake pops.

Cake Pops

This year I have expanded the amount of food searching I do on the web. I have a host of websites that I scope out at least weekly. There is a great deal of ingenuity in the food world and one of the more striking ideas that I've seen in recent months are Bakerella's cake pops. I had some leftover cake from an earlier recipe, so I ran a beta-test of these pops to great success.

The recipe is as easy as the concept is amazing. You can start with any cake you want. Crumble it up and mix it with frosting. Form balls and freeze them for a few hours. This is one of the tricky steps because your hands get covered with the dough so washing them occasionally becomes a must. Insert sticks into the balls, let them freeze some more, and dip them in melted candy-making chocolate. Let the chocolate solidify and serve. The chocolate makes for a crunchy shell that conceals the tasty, sweetened cake on the inside.

Now for the tragic part of this story, I made red velvet pops covered in white chocolate and mint-chocolate pops covered in milk chocolate. I stood the pops up in dense styrofoam blocks to solidify and serve. I put the pops into my car and slowly drove the few miles to our end-of-the-year symposium. Unfortunately, these cake pops are extremely top-heavy. And without someone to help me, they all managed to flip themselves all over my car. I didn't mind eating them in this state, but I imagine others might not feel as safe. They were delicious, no doubt, but it was just not meant to be that day. If you're looking to wow a group of people, definitely make these pops. I suggest using a solid base or just setting the pops in cupcake liners to solidify and serve. You won't lose any wow-factor and you'll guarantee your pops survive to be served.