Showing posts with label Cake. Show all posts

Thursday, October 21, 2010

Coconut Cake

Coconut seems to be one of those flavors that someone either loves or hates. I'm partial to almost all flavors, especially in sweets. But I'm still amazed by people who will run for the trashcan when they bite into a coconut truffle from a chocolate sampler. Coconut is a wonderful substance in all its forms, whether it's a pina colada or a macaroon. It has a toasty nuttiness when it has been browned and a sweet chewiness when it has not. It is the perfect companion to fruits, nuts and chocolate.

A newer member of my lab had a birthday recently. She had previously mentioned loving a coconut cake from a Thai restaurant in her home town, so I set out to find a recipe that would make a reasonable facsimile.

Coconut Cake
Makes 8-10 servings. Adapted from Darlene Schmidt.

Ingredients
For the cake
6 eggs
1.5 cups coconut milk (not lite)
7 tbsp sweetened shredded coconut
1 cup sugar
1/8 tsp salt
1 cup butter, melted
2 cups flour
4 tsp baking powder
For the icing
3 egg whites
1 cup sugar
1/2 tsp cream of tartar
1 pinch of salt
2 tsp coconut extract
1 cup sweetened shredded coconut, toasted

Directions
Preheat oven to 350 degrees. Grease two 9" cake pans, line bottoms with parchment and grease parchment.

Stir the coconut into the coconut milk and set aside to soak.

Separate egg whites from yolks. Place the whites in a medium mixing bowl. Beat egg whites with an electric mixer until stiff peaks form. Set aside.

Place yolks in a large bowl. Add sugar, salt and melted butter. Beat to a smooth consistency for about 1 minute.

Combine baking powder and flour. Add the flour mixture and coconut mixture to the yolk mixture. Beat 1-2 minutes with an electric mixer until well combined, about 1-2 minutes. Fold in the beaten egg whites into the batter. Pour batter into prepared pans and bake 30-40 minutes until a toothpick inserted in the center comes out clean. Cool completely.

To make the frosting, prepare a double boiler by placing a medium metal or glass bowl over a pan of simmering water (note - don't let the water touch the bowl). Combine egg whites, sugar, cream of tartar, and salt in the bowl. Start beating this mixture using an electric mixer at low speed. Gradually over 5 minutes, continue to beat while incrementally increasing the speed to high. Add the coconut extract as you move to the high speed and beat to combine. Remove from heat.

To assemble, place the first layer of cake on a serving plate. Top with a generous amount of icing, spreading to the edges. Place second layer on top. Cover the cake with the remaining icing (it doesn't have to be perfect). Lastly, cover the entire cake with the toasted coconut.
Coconut Cake

This cake is quite amazing. It has every form of coconut you could imagine save climbing a tree and chopping down a fresh one. The coconut meat, milk and extract all add layers of flavor and complexity to this very moist cake. The frosting tastes like a light coconut marshmallow and gives the cake a very dreamy quality. Though this cake is not for the coconut haters at your work or among your friends, for us coconut lovers it is a celebration of a delicious tropical "fruit."

Saturday, September 11, 2010

Chocolate Butterscotch Cake

After making many free-standing cakes this year, I needed a break. If you want to make a tasty, good-looking cake, it can take quite a while. At the very least, you spend a couple hours spread out over a few days. But I wanted to break free of my rut and do something easy but delicious. I was charged with making a cake for a true Southern boy, so who better to turn to than Paula Deen?

Chocolate Butterscotch Cake
From Paula Deen. Yields 12 servings.

Ingredients
3/4 cup softened butter
1.5 cups sugar
2 large eggs
1 tsp vanilla extract
2 cups flour
3/4 cup cocoa powder
1 tsp baking soda
1/4 tsp salt
1.5 cups milk
12.5 oz butterscotch
12 oz whipped topping, thawed
3.5 oz butterscotch pudding mix

Directions
Preheat oven to 350 degrees. Grease and flour a 13x9" baking pan.

In a large bowl, beat butter and sugar on medium speed until creamy. Add eggs, one at a time, beating well after each addition. Beat in vanilla and set aside. In a medium bowl, combine flour, cocoa, baking soda, and salt. Gradually add this to the butter mixture, alternatively with milk, beginning and ending with flour. Spoon into prepared pan.

Chocolate Cake Base

Bake the cake for 25 minutes or until a toothpick comes out clean.

Poked Full o' Holes

While the cake is still warm and using the handle of a wooden spoon, poke holes halfway through the cake at 1/2" intervals.

Covered in Butterscotch

Pour butterscotch evenly over the cake and allow to cool completely.

Soaked In

After cake has cooled, combine the whipped topping and pudding mix in a medium bowl. Spread evenly over the cooled cake. Be sure to make this frosting right before you use it and don't worry if it tastes gritty. The pudding will set up in the whipped topping gradually over time. This makes it taste better, but it also makes it more difficult to spread once it has started to set up. Cover the cake and refrigerate it. When ready to serve, cut it into squares. Don't forget an insulin shot as a chaser.

For as simple and saccharine as this cake sounds, everyone loved it. The birthday boy even took home the remainder over the weekend and had to bring my baking pan back to me. The butterscotch keeps the cake lusciously moist and complements the chocolate very well. The additional butterscotch on top with a creamier base is actually a nice relief from the intense flavor and sweetness from the cake. I'm always amazed to see what types of desserts come out of a Southern kitchen. I really shouldn't be surprised that everything is so sweet since any baby south of the Mason-Dixon line is raised on sweet tea instead of formula. And let's face it, no one does a killer, simple dessert like Paula.

Thursday, September 2, 2010

Smith Island Cake

I don't know if you realize this, but people love cake. Cake tastes good by itself, with some frosting, fruit, chocolate, pudding, bacon, whatever. I love cake too. I love to make it for other people. In every flavor, shape and size. My latest creation comes straight out of the pages of Cook's Country Magazine, but it's the pictures that really speak for themselves.

Smith Island Cake
Yellow cake recipe from Epicurious, cake recipe from Cook's Country Magazine; serves 8-10.

Ingredients
Yellow Cake
3 cups cake flour
1 tbsp baking powder
1/2 tsp salt
1 cup unsalted butter, softened
2 cups sugar
5 large eggs
2 tsp vanilla extract
1.25 cups buttermilk

Frosting
10 oz bittersweet chocolate, chopped
1 cup heavy cream
1 cup sugar
1/4 tsp salt
1 tsp vanilla extract
1/2 cup unsalted butter, softened

Directions
Frosting
Place chocolate in large bowl. Heat cream, sugar and salt in a small saucepan over medium-low heat until sugar dissolves and mixture begins to simmer. Pour cream mixture over chocolate and whisk until smooth. Whisk in vanilla and butter until glossy. Cover and refrigerate until firm, but spreadable, about 1 hour.

Yellow Cake
In a medium bowl, sift flour, baking powder and salt. Set aside

Beat 1 cup butter with an electric mixer on medium-high for 3 minutes until light in color. Add the sugar, 1/4 cup at a time, beating 1 minute after each addition. Add eggs, one at at time, beating well between additions. Reduce mixer speed. Stir vanilla into the buttermilk. Add flour mixture and buttermilk mixture alternatively beginning and ending with flour. Mix just until incorporated.

Yellow Cake Batter

Preheat oven to 350 degrees F. Grease and flour two 8" cake pans (or more if you have them), and line them with parchment paper. Spoon about 2/3 cup of yellow cake batter into prepared pans.

Yellow Cakes Before Baking

Spread batter evenly in pan. Bake until edges are golden and cake springs back when touched, 10-14 minutes. Cool pans on rack for 5 minutes. Run a knife around the edge of the pan, then invert cakes onto rack to finish cooling. Cool pan to room temperature, then wipe clean and repeat the process to make a total of eight thin cake layers.

To Assemble

Stack o' Cakes

I froze my cake layers for a couple of days and they did perfectly well. If you do want to make these ahead, be sure they are separated from each other with plastic wrap. Otherwise they may stick together.

Frosting First Layer

Place one cake layer on a serving platter. Spread 1/4 cup frosting over the cake. Be sure to spread the frosting as evenly as possible, taking it to the edge of the cake.

Layers Stacked

Top this layer with another layer of cake and repeat the process until there are 8 cake layers, all with a thin layer of chocolate frosting between them.

Smith Island Cake

Use the remaining frosting to cover the top and sides of the cake. Serve.

Cake, Sliced Open

The many layers are the real show-stopper with this cake. People marvel at your skill to pull off such an intricate looking cake. Even if your cake is domed on top and does not have the smoothest frosting, you will still wow a crowd.

Smith Island Cake Slice

Furthermore, this cake tasted great. With all of those layers of cake and frosting, one would think this would be too sweet, but the layers meld together more to make each bite delicious. People who like to eat the cake and frosting separately may have problems with this cake, but everyone I know that tried it liked it.

Here's some food for thought: there are many examples of cakes that take layering to the extreme. Maybe this is some sort of convergent evolution. The other cakes that come to mind include crepe cakes (20 or so crepes with delicious fillings in between) and doberge cakes (filled with pudding). In fact, according to Wikipedia, it seems that every country has their own name and possible spin on this idea with cakes and pastries. The French mille-feuille ("thousand leaves") layers puff pastry and pastry cream with fancy chocolate stripes on top. Add some almond flavoring and it is a napoleon, named more for the city of Naples than the diminutive French emperor (not Sarkozy). Give it more Italian flair and it is mille foglie, which can have some sponge cake thrown in. From all of these, it seems that more layers means more work, which means greater to detail and a higher-end cake overall. Who knew that Smith Island, Maryland, was so worldly?

Saturday, August 21, 2010

Carnegie Deli - NYC

The adventures in New York City continue! I love immersing myself in the cultural traditions of whatever area I visit. Even with all of the various cultural influences in any metropolis, there are some foods that are decidedly New York. One restaurant that I love to visit that serves a classic NYC menu is The Carnegie Deli. This eatery is nearly three-quarters of a century old, but the food is as fresh and tasty as you'll find anywhere in Manhattan. This restaurant is a typical New York-style deli with obvious Jewish influences (matzoh balls and knishes are proudly displayed at the long to-go service counter). They keep the food straightforward (simple is too, well, simplistic) but never compromise on flavor.

After sitting at our table in the middle of the hustle and bustle of a Sunday morning, we perused the menu for a while, trying to find the one thing we would order among the myriad of deletable possibilities. If they ever invent a bottomless stomach, it would make choices like this so much easier. Meanwhile, piles of sliced meats kept passing our table and immense cakes spinning in a cooler case were visible from my seat, a prelude of tastes to come.

Pickle Appetizer

After you order, a huge pile of pickles appears at the table. These Kosher dills are beautifully pickled, not as much as the ones in the store. They are perfectly crisp but packed with garlic acidity. Pickles at 11am does not usually sound like a good idea, but it's hard not to partake. When in Rome...

Hot Pastrami Sandwich

Unlike most restaurants, this deli does not attempt to have all entrees reach the table at the same time. If you order one of their sandwiches, it will be out faster than you can spell "gefilte fish." They slice the hot deli meats to order. I ordered hot pastrami on rye, which was about 5-6 inches tall in the middle of the sandwich. Most of the sandwiches passing by were combinations of hot pastrami and corned beef that were twice as thick as mine, but I decided to get the "lite" version. The meat was sumptuously warmed and just melted in your mouth from the marbled fat throughout. I had to eat half the meat with a fork, but that was not a problem. If you make food tasty enough, it does not matter how you have to eat it. Once the sandwich was manageable, I applied a smidge of deli mustard to the bread and devoured this hand-held wonder in short order.

Blintzes

The other entree we ordered which came out about 10 minutes after the sandwich was a trio of blintzes. This breakfast fare is a little like a sweet burrito. The shell is very thin and a bit crispy. The innards can be a variety of flavors and we selected cheese (a sweetened ricotta-like cheese filling) and strawberry (tasted more fresh than the saccharine berry gel you buy at the store). Both types had an amazing flavor that really is a must if you've never tried them.

Blueberry Cheesecake

As if all that was not enough, I was not going to leave without some dessert. While the Carnegie Deli's sandwiches and entrees are awesome, they have some of my favorite New York-style cheesecake in all of Manhattan. Cheesecakes come in many flavors, but the major difference between them all is texture. Some are more gritty from the incorporation of ricotta. Others are very dense (a la Cheesecake Factory) or crumbly. But in New York, you find the richest, creamiest, dreamiest cheesecake known to mankind. The Carnegie Deli makes cheesecakes in this traditional fashion, even including some fruit on top in case you need some antioxidants. It is hard to describe just how astonishingly creamy this cheesecake is, but it's almost like eating a block of sweetened, flavored cream cheese. The crust is tender enough to add a little different texture to the cake, but it does not distract you from the goods in the center of your slice. The deli sells cheesecakes from 6" to 12" in a few different flavors. They will even ship the cheesecakes overnight to anywhere in the country. The next time I'm in the mood, I might do this instead of going all the way to New York for a slice.

The Carnegie Deli is a wonderful experience that showcases New York's traditional food offerings. Like many institutions on the island, the walls are covered with signed photographs of various celebrities (we had Bret "Hitman" Hart watching over us during our meal). The restaurant is open from 6:30am until 4am and it can get quite busy during peak hours. Try to find an off time to go if you don't want to wait in line. And you can always arrange for a Carnegie Deli package to come to you via Fed-Ex.

Thursday, August 19, 2010

Magnolia Bakery - NYC

GPS is a wonderful invention. Especially now that with a decent smart phone (and a good cell signal), you can make your way around any city with ease. That is how we managed on our recent trip to New York City. One benefit of this technology, as we discovered, is that it can help you discover places that you did not know were there. That is how we stumbled across one of the Magnolia Bakery storefronts while meandering on Bleecker Street.

Over the past 14 years, the Magnolia Bakery has become a New York institution. Some credit the cupcake's recent rise in popularity to this bakery. Walking into the store, they have a "self-serve" section just for their cupcakes.

Magnolia Bakery Cupcakes

You can find all sorts of varieties including, but not limited to, chocolate, vanilla, red velvet, and lemon. The frostings appear in a range of colors with the very interesting decoration style that almost makes the cupcakes appear like they have nests on top. Some festive white sugar orbs finish off the cakes to give them a sophisticated but playful look.

Magic Cookie Bar

We, however, opted to buy some goodies out of the huge display cases. We ordered a refreshing, unsweetened, raspberry iced tea to sip on while we perused the dozens of cakes, cookies and other goodies. The banana pudding and hummingbird cake looked incredible, but I wanted something smaller. The first item I chose was the magic cookie bar. On top of a graham cracker crust sits a dense combination of coconut, nuts and chocolate chips. The cookie bar was definitely sweet, but not cloyingly so, which is often a flaw in this type of treat. It was very delicious and I made short work of it.

Red Velvet Cheesecake

By far, my favorite dessert was the most surprising - red velvet cheesecake. Somehow, the bakers have infused a light, creamy (likely no-bake) cheesecake base with the earthy chocolate flavor and ruby red of the Southern classic. This cheesecake tasted just like the original cake and it did not feel immensely heavy. It sat atop a thick Oreo cookie crust to give it some extra chocolate crunch. A dollop of whipped cream and some chocolate shavings on top made the cheesecake look especially appealing.

Not only did my phone help me find this incredible bakery by total happenstance, but I was able to see that they are great at more than just cupcakes. You can see evidence of this in the park across the street where patrons sit beneath the trees to enjoy their various sugary treats. Though if I lived in the city, I'm sure a dozen cupcakes would follow me home whenever I stopped by.

Saturday, July 17, 2010

Lime-Pistachio Angel Food Cake

For years, I said I would never make an angel food cake from scratch. I swore up and down that it was so much easier to buy a box mix. I prefer to make most cakes from scratch, but boxed angel food cake is so convenient. However, every once in a while, you get that urge to go back to basics.

Bon Appetit Magazine had a great recipe for a lime angel food cake covered with crushed pistachios. It is very lengthy and detailed, so follow the link for the full recipe. I will simply outline the overall steps. Firstly, you have to use very fine ingredients. You want the cake to be as light as possible with a moist, soft texture. To that end, you combine four-times-sifted cake flour, superfine sugar and whipped egg whites with a little vanilla and lime zest. Be careful when mixing these ingredients. Their delicate nature means that things could easily go awry. Carefully fold the dry ingredients into the whipped egg whites so they don't lose their air or volume. Simultaneously, you have to make sure the dry ingredients are thoroughly mixed in. I undermixed at this stage, so my cake ended up with the occasional pocket that was less cakey and more sticky and chewy. It was not a terrible problem, but it definitely detracted a bit from the overall experience.

Lime Angel Food Cake

Next is the easy part - baking the cake. Then you allow it to cool completely. Be sure to a) use an angel food cake pan with a removable insert, and b) invert the pan after cooking. If the cake is not inverted, it will collapse because it does not have enough structure. Also take care if you put the cake atop a bottle to cool because it will be very top heavy.

Lime-Pistachio Angel Food Cake

You could probably stop here if you really wanted. The cake would be delicious by itself or with some fresh fruit or whipped cream. But to go the extra mile (since you've already worked so hard to sift, beat and otherwise coax your ingredients to form a beautiful cake), you make a lime simple syrup to act as the glue to hold the crushed pistachios all over the cakes surface. Lastly, you drizzle a lime glaze over it all.

It is definitely true that making an angel food cake from scratch is a bit of an ordeal compared to a white or chocolate cake. You have to spend more time and take more care to ensure that everything turns out just right. But in the end, you get to control what goes into the cake. You get to flavor the batter. Plus, you avoid all of the additives put into cake mixes. I think this cake turns out a lot lighter and airier in texture compared to the boxed mixes. It feels like you are eating a cloud. The lime flavors that permeate the cake as well as in the glaze add a fresh fruitiness. The pistachio flavor is more diffuse and the small nut bits add a little crunch to the outside. Overall, I'd say this cake was a heavenly success.

Tuesday, February 9, 2010

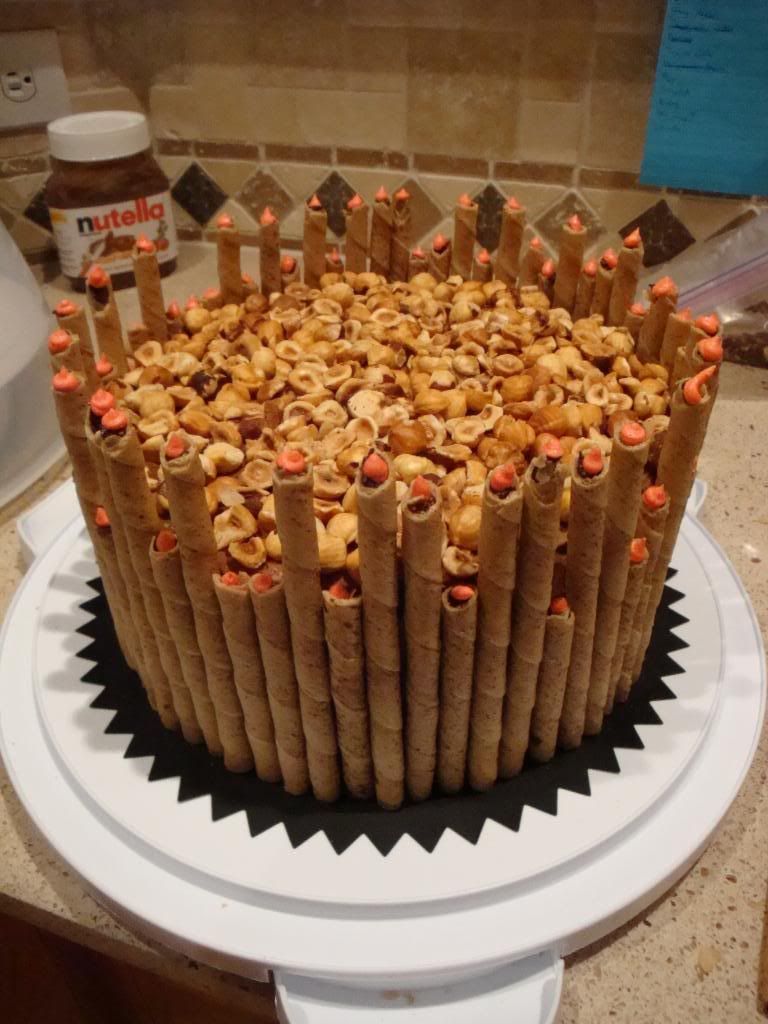
Nutella Cake

Last week, we celebrated another birthday in my lab. When I was pondering, I came up with the idea to make a Nutella cake. Little did I know this would fit right in with World Nutella Day. It seems my finger is always on the pulse of the culinary community, even when I don't know it.


I drew inspiration for the outside of the cake from Rose Levy Beranbaum's book Rose's Heavenly Cakes, specifically her "chocolate tomato cake." The cake is surrounded by Pirouette cookies of varying heights. Each of these cookies is topped by a small dollop of red frosting to act as little candles. If you want to make this cake for an age-conscious birthday person, please note that I had to use 67 cookies to completely surround the cake.


The inside of the cake, however, was my own creation. I used my basic chocolate cake recipe. This cake normally uses 1.5 cups of coffee to accentuate and darken the chocolate flavor, but I substituted one-third of that with Frangelico, a hazelnut liqueur. As a third surprise layer, I baked my traditional banana bread recipe in a round cake pan. The banana bread stays wonderfully moist and I may use it to make a full cake one day.


So far, this cake is not very Nutella-y. That's where the frosting comes in to bind it all together, both in construction and in flavor. I mixed together 1 cup of Nutella with 3 cups of powdered sugar and 2 tablespoons of milk to produce just enough frosting to cover this 3-layer, 9-inch cake. On top of all this, I placed some toasted, chopped hazelnuts. The result is a behemoth cake that astounded everyone. I have a hard time deciding if it had too many elements or just enough to make it a really good cake. All of the flavors blended together beautifully to produce a cake that will be tough to beat for the next birthday.

Tuesday, December 29, 2009

Chocolate Mousse Cake

Chocolate Mousse Cake

My coworkers have made it abundantly clear that they love chocolate. I've made a number of different cakes for them and the chocolate ones always receive rave reviews (after a bit of silent savoring). So for our December birthdays I thought I would pull out all the stops: chocolate mousse cake. Chocolate cake filled with chocolate mousse and topped with straight-up chocolate. Talk about a chocolate-lover's dream...

Chocolate Mousse Cake
Ingredients
Mousse
1 package gelatin
3T cold water
1/4 cup boiling water
1 cup sugar
1/2 cup cocoa powder
3 cup heavy whipping cream
Cake
2 cup flour
2 cup sugar
3/4 cup cocoa powder
1.5 tsp baking powder
1.5 tsp baking soda
3/4 tsp salt
1 cup milk
1 cup brewed coffee
3/4 cup vegetable shortening
2 eggs
1 block of bittersweet chocolate

Instructions
Mousse
1. Combine gelatin and cold water in a small bowl. Let it stand for about 2 minutes, then pour in boiling water. Stir mixture until gelatin dissolves. Set gelatin mixture aside.
2. In another small bowl, combine sugar and cocoa powder.
3. Beat cream in a standing mixer until it becomes foamy. Gradually add sugar-cocoa mixture. Beat until the soft peak stage. Thoroughly beat in gelatin mixture, but do not overbeat the cream. Cover and chill the mousse for at least 4 hours.

Cake
1. Preheat oven to 350 degrees. Grease two 9" round cake pans and line bottom with a round of parchment. In a large bowl, combine flour, sugar, cocoa powder, baking powder, baking soda, and salt. Add milk, brewed coffee, vegetable oil, and eggs, beating mixture until smooth.
2. Split mixture between two prepared cake pans. Bake for 20-25 minutes until a wooden toothpick comes out clean. Let cool for 10 minutes, then remove from pans and let cool completely, about 1 hour.

Assemble Cake
1. With a serrated knife, cut off the top of one cake so it is level. Place this layer, cut side up, on a serving plate. Spread half of mousse over this layer (perhaps less, depending on how moussey you want it). Carefully place remaining cake layer on top of the first layer. Spread the remaining mousse around the top.
2. Microwave block of chocolate in 5 second bursts at half power until soft but not melted, about 15 seconds. Using a vegetable peeler along the edge of the block, make chocolate curls and shavings.
3. Top cake with chocolate curls. Refrigerate cake until serving.

Chocolate Mousse Cake

Chocolate Mousse Cake

Cake Pops

The following is the tragic story of a tasty, imaginative treat. The setting: end of the semester. The protagonist: cake pops.

Cake Pops

This year I have expanded the amount of food searching I do on the web. I have a host of websites that I scope out at least weekly. There is a great deal of ingenuity in the food world and one of the more striking ideas that I've seen in recent months are Bakerella's cake pops. I had some leftover cake from an earlier recipe, so I ran a beta-test of these pops to great success.

The recipe is as easy as the concept is amazing. You can start with any cake you want. Crumble it up and mix it with frosting. Form balls and freeze them for a few hours. This is one of the tricky steps because your hands get covered with the dough so washing them occasionally becomes a must. Insert sticks into the balls, let them freeze some more, and dip them in melted candy-making chocolate. Let the chocolate solidify and serve. The chocolate makes for a crunchy shell that conceals the tasty, sweetened cake on the inside.

Now for the tragic part of this story, I made red velvet pops covered in white chocolate and mint-chocolate pops covered in milk chocolate. I stood the pops up in dense styrofoam blocks to solidify and serve. I put the pops into my car and slowly drove the few miles to our end-of-the-year symposium. Unfortunately, these cake pops are extremely top-heavy. And without someone to help me, they all managed to flip themselves all over my car. I didn't mind eating them in this state, but I imagine others might not feel as safe. They were delicious, no doubt, but it was just not meant to be that day. If you're looking to wow a group of people, definitely make these pops. I suggest using a solid base or just setting the pops in cupcake liners to solidify and serve. You won't lose any wow-factor and you'll guarantee your pops survive to be served.

Saturday, October 17, 2009

Apple Cider Cake

My cakespertise (cake-expertise) was requested recently. Our task - a fall-themed cake. Just off the heels of my previous cake, the five-spice fall cake, I had to do some brainstorming. I draw my inspiration from a couple different sources. For the previous cake, I had some particular flavors that I wanted to include, so I tried to base the design of the cake off of that. The other way I create my culinary concoctions is to use another dish for inspiration. So for this cake, I enlisted the help of another fall favorite, apple cider.

Apple Cider Cake

I found what seemed like a good cake recipe at Cooks.com. This website compiles the recipes that different people have for the same item. The one I chose seemed the most straightforward, though I did substitute butter for the shortening as the latter makes me feel a little disgusting when I cook. The cake came out fine, perhaps a little dry, but the apple cider flavor was there. It was muted through all the other ingredients, but it was definitely there.

Now to really personalize this treat. For a filling, I decided on diced cinnamon apples. I peeled and cubed 5 gala apples and placed them in a saucepan with 4T butter, apple pie spice, and an unknown amount of sugar (I just dumped some in, it was probably somewhere between 1/4 and 1/2 cup). I let this cook in the saucepan until the apples were tender and the sugar and butter had formed a thick sauce. These apples would be good as a side dish, dessert or topping for most meals as well. They're the homemade version of the little well of apples that comes with many frozen dinners and, quite frankly, I like mine better because they are not super heavy on the sauce.

For the frosting, we settled on cinnamon buttercream. I made my standard buttercream and included a decent amount of ground cinnamon and cinnamon extract to produce a pretty pungent cinnamon topping. After coloring the frosting orange and brown, we assembled the cake and piped on some simple fall leaf outlines to finish it off. Despite the slight dryness of the cake, the apples and frosting made the cake quite awesome. A glass of the remaining apple cider on the side made for a great late-night snack.

Friday, October 16, 2009

Five-Spice Fall Cake

Two people in my lab had birthdays last week, so we had a joint celebration for them. I volunteered to make the cake (as if I’d pass up the opportunity). With autumn finally arriving, bringing with it cooler weather and various gourds in the grocery stores, I’m in the mood to take advantage of fall flavors. Some of my favorite spices are the warm, hearty spices that come with this season: clove, cinnamon, ginger, nutmeg, etc. Here’s how I combined all of these into a cake.

Five-Spice Fall Cake

As far as flavors are concerned, I decided to do a two layer cake with each layer having a distinct flavor. I baked up a pumpkin cake and a gingerbread cake. I had a bit of a time crunch while making the buttercream frosting, so I left the flavor as plain vanilla. I did want to color the frosting red since this cake was for a Chinese person and a Taiwanese person, but a pure, bright (Communist) red is extremely difficult to achieve. Mine ended up pink by the time I ran out of red coloring gel, so I started using tones of burgundy, pink and black. The end result was something that was a bit purple-maroon. Thus, I had to change my plans a bit. I decided to go more simple in my design, so with some borders piped in blue, I added happy birthday wishes in both English and Chinese. I found the Chinese version on a couple different websites, and I just did the best I could to replicate the characters.

Gingerbread Cupcakes

There was enough of the gingerbread batter left over to make some cupcakes. Normally, I eat the cupcakes myself, but I thought I’d bring them in for the birthdays too. I had originally planned on cutting out a circle of white chocolate for a mock-up of the Taiwanese flag, but since I could not get a good red buttercream, I used the white chocolate to fill the cupcakes. For frosting, I made a chocolate buttercream to which I added five-spice powder. The anise and spice tones of five-spice powder are a welcome addition to my fall repertoire and they paired nicely with the gingerbread. On top of the cupcakes, I piped messages of “36” and “ox” since those are the birthday boys’ ages and star signs, respectively.

Cake Aftermath

As you can see above, the cake and cupcakes were a hit. The cakes stayed very moist, especially the pumpkin. I think adding vegetables or applesauce to cakes does a fantastic job of keeping them moist. The only issue you face in assembling a cake is that the layers will fall apart because they have so much delicious moisture. That is one of the paradoxes of cake baking - too moist and you cannot make it look fancy, too dry and most people will find it too hard to swallow. And the great news about these cakes is that all of my Chinese writing was legible and understandable. My worst fear would be to misplace a line and all of a sudden I accidentally insulted someone’s mother. But that did not happen and everyone seemed very happy to celebrate the start of fall with a big ol’ slice of this well-balanced and surprising cake.

Thursday, July 30, 2009

Let Them Eat Cake! - 7/30/2009

Cake class at Durham Tech just wrapped up this week and it's time I update on the wide and varied cakes I've been making.

Surf-day Cake 1

Surf-day Cake 2

My PI had a birthday a couple weeks ago, so I had to find out some more about him for his cake. I heard he liked surfing and had transient obsessions with Goldfish crackers. So from that I came up with this surf-day cake. The cake was vanilla with a chocolate buttercream. The sand for the beach was a combination of brown sugar and confectioners' sugar with a touch of white sprinkles. The surfboard to the side was made of gumpaste. I felt the Duke D came out nicely, but the trade-off was that my goldfish were a little rough. I think this cake was my most creative in decoration of the entire class and it went over well at our birthday get-together.

Hydrangea Cake

Last week was how to build multi-layered cakes (>3 layers). There are some architectural features that are involved in this process, such as stabilizing the layers with extra pieces of cardboard and vertical supports through lower layers. Most people in the class made cupcake-shaped cakes. I chose instead to make hydrangeas in a basket. The hardest part is determining when you're done when trimming up the cake. I would have definitely cut mine down too much if I didn't have input from my classmates. The cake was chocolate with a touch of mint. The filling was mint chocolate chip and the flowers were vanilla buttercream. Even though this cake was twice as tall as usual, almost all of it went in one day when I brought it into lab.

Sequencing Cake

My labmates loved the chocolate cake from the previous week so much, that this past week I decided to use the same recipe (scroll down for the cake recipes), except I mixed raspberry jam into the cake. For the filling I used the previous week's chocolate buttercream and mixed in some more raspberry jam and some pine nuts for a nice, soft crunch. Then I frosted the cake in vanilla buttercream. Our summer undergraduate student is leaving this week, so I decorated the cake with DNA sequence tracings as a farewell. As promised, below are the cake recipes as well as my basic buttercream recipe that can be retooled any number of ways:

Vanilla Cake - makes 3x9" round cakes

2 cups cake flour
1.75 cups + 1.5 tsp all purpose flour
2.5 tsp baking powder
2 sticks unsalted butter
3 cups granulated sugar
0.75 tsp salt
1 tbsp vanilla extract
1 cup egg whites (from ~7 eggs)
1.5 cups milk

Heat oven to 350 degrees. Spray pans with nonstick cooking spray, line bottom with parchment paper and spray again. Sift together flours, baking powder and salt. Combine butter and sugar in a mixer on medium speed until fluffy. Add the vanilla. Set mixer on low and gradually add the egg whites. Alternately add the flour mixture and the milk in two batches beginning with the flour mixture. Scrape down the sides of the bowl between each addition and beat just until everything is mixed together. Divide batter between pans and bake about one hour or until a tester comes out clean. Allow cakes to cool about 20 minutes then remove from pans. Wrap and store.

Chocolate Cake - makes 3x9" round cakes

2 2/3 cups all purpose flour
1.25 cups + 2 tbsp cocoa powder
2 tsp baking powder
1 tsp baking soda
1 tsp salt
1 cup sour cream
1 tsp vanilla extract
1 tsp almond extract
2 sticks unsalted butter
2 cups granulated sugar
2 eggs
1.25 cups strong coffee

Heat oven to 350 degrees. Spray pans with nonstick cooking spray, line bottom with parchment paper and spray again. Sift together flour, cocoa, baking powder, baking soda, and salt. In a separate bowl, combine the sour cream and extracts. In the bowl of a standing mixer beat the butter and sugar until smooth. Set mixer on low, add eggs one at a time. Alternately add the sour cream mixture and the flour mixture starting and ending with the flour mixture. Scrape the sides of bowl down between additions. Slowly add the coffee. Scrape down the bowl, and beat thoroughly until combined. Divide the batter between the cake pans and bake about an hour or until the toothpick comes out clean. Allow the cakes to cool about 20 minutes, then remove from pans. Wrap and store.

Basic Buttercream - makes 2.75 cups

1 stick butter, softened
1 tsp vanilla extract
1/8 tsp salt
16 oz powdered sugar
3-5 tbsp milk

Beat the first 3 ingredients at medium speed with an electric mixer until creamy. Gradually add powdered sugar alternately with 3 tbsp milk (1 tbsp at a time), beating at low speed until blended and smooth after each addition. Beat in up to 2 tbsp of additional milk for desired consistency.

Sunday, July 12, 2009

Star-Spangled Cake & Mad Hatter - 7/12/2009

This week had some preparation for a weekend trip (see next post), so this post is a little shorter than some of the other epic entries, but it's still delicious nonetheless.

Mad Hatter Cuban Sandwich

Early in the week, I had the chance to go to Mad Hatter for brunch. I opted for their Cuban, seen above. It is a very non-traditional take on the usual pressed sandwich. Instead of a relatively thin compilation, the Mad Hatter take is piled high with thickly sliced pork and a slightly spicy sauce on top, all on a thick, chewy bread (not Cuban bread, but still very good). On the side is a cold pasta with bell peppers and tomatoes. Not pictured is a "Mostess cupcake" in the style of the Hostess chocolate cupcakes with the curly-cue of white frosting and white cream filling. I was surprised to find the cupcake very dry, making the whole experience a little disappointing. I've had their cake before, and it was pretty good, especially after an overnight chill in the fridge. I will definitely go back to Mad Hatter, but I will be a little more wary of the desserts.

Star-Spangled Cake

The cake theme of the week was Fourth of July, despite the fact that the holiday has passed. I decided on some All-American flavors - vanilla spice cake with an apple butter filling - similar to what you find in apple pie. I will admit to save time I used a box cake mix, but I did throw pretty much every spice I could think of into the batter (including, but not limited to, cinnamon, ginger, nutmeg, allspice, and cloves). The cake was moist and a little more airy than is good for frosting, but luckily this week we were also working with fondant. Fondant is like a frosting dough. You can buy it from stores like Michael's and roll it out on a cornstarched surface. Then you drape it on top of your cake, smooth it out and cut away the excess. I can easily see fondant being a great way to save a cake that does not look like it will be presentation-worthy by itself. Most people liked the slightly chewy quality it brought to the cake. As a final note, the stars on top are made of gum paste, which when set to dry turns almost inedibly solid after a couple days (but they sure look good).

Fallen Stars Cake

Monday, June 22, 2009

Cake Decorating Win - 6/22/2009

Good news! I'm not totally inept at making cakes!

Chocolate-Macaroon Cake

After last week's cake-wreck, I was glad to find out that I have some skills with the baked goods after all. They key is not taking shortcuts with the cake or frosting. The cake itself is vanilla-cherry with some cherries mixed in. The frosting is dark chocolate with almond extract. In between the layers, in addition to buttercream, is crumbled coconut macaroons. To top it off, I sprinkled on some toasted coconut. This cake was for the birthday of someone in my lab who likes coconut, and it was a big hit. My next goal is to make cakes with more intricate and involved decorations now that I have a handle on the more understated techniques.

Basil-Eggplant Rolls

I did do a good deal of cooking this week myself, but I will not claim these delightful hors d'oeuvrs as my own. These are the wonderful creation of my new beau. From what he told me, they are eggplant slices wrapped around tomato paste and fresh basil, then breaded and baked. Quite wonderful.

Baked Tea Salmon

The main course to follow the above eggplant rolls was this baked salmon. It was seasoned with dried tea leaves (sadly I cannot remember which type of tea) and seafood seasoning. It was grilled in the foil packet that you can see above. It came out very moist and well flavored. Who would have thought tea could be so versatile?

I will mention some of the other food I made this week, even if I ate it so fast I forgot to take pictures: fresh local berries with balsamic syrup, roasted green beans with cashews, cantaloupe wrapped in prosciutto, garlic bread, and grilled corn with orange-hoisin butter. I also got a start on this week's cake, but I won't ruin the surprise.

Thursday, June 11, 2009

Large Update - 6/11/2009

I have done a great deal of cooking in the last couple of weeks, so without wasting time, let's just start in with it.

Pineapple-Vanilla Jam

I did some apartment-sitting for a classmate while she got to vacation in Tahiti with her husband. She was very thankful and presented me with this gift upon her return. For those that don't speak French, it is pineapple-vanilla jam. The pineapple provides the stable base for the jam and the vanilla gives it a delightfully heady plume of aromatic flavor. It is very delectable on toast and just something different from your run-of-the-mill strawberry jam or orange marmalade.

CSA

My community supported agriculture has been fairly similar over the past weeks. The main features are strawberries, blueberries (not pictured), and lots of squashes: zucchini, Mediterranean zucchini and yellow squash. I accumulated so much zucchini that I had to do this:

Blueberry-Zucchini Bread

Paula Deen makes a mean zucchini bread. I had so much zucchini that I made two batches, which is supposed to make 2 loaves per batch, hence the high productivity. Instead of chocolate chips, I substituted one pint of blueberries in each batch. I also doubled up the spices (cinnamon and nutmeg) in the first batch and added some cardamom and ginger powder in the second batch. All in all, I made one large loaf, 4 mini-loaves, 4 large muffins and 6 regular muffins, all of which were delicious. On a random note, the blueberries turned the bread slightly blue-green instead of purple.

Brownie-Filled Chocolate Chip Cookies

On the subject of Southern cooking, Southern Living had on the inside cover of their latest issue something I could not resist making. They may look like normal chocolate chip cookies, but trust me, they're huge. Each has half a cup of dough in it. Plus, the real surprise is in the center: the cookie contains a brownie. That's right, Southern Living managed to stuff a baked good inside of another baked good. These treats are a tremendous endeavor to eat, but well worth it, even if you feel like you have to take a nap or hit the gym right afterward.

Polenta French Toast

Mom came into town for a visit and her birthday, so I/we did quite a bit of cooking and baking. For breakfast, I managed to find this wonderful gluten-free recipe care of Martha Stewart. You prepare one batch of polenta (with an hour of frequent stirring), adding in some milk, maple syrup, orange zest, cinnamon, and raisins. You then pour the polenta into baking dishes and let it set overnight. In the morning, you slice up the set polenta and pan-fry it until golden brown. Top it with maple syrup and some fresh North Carolina blueberries (or whatever state you happen to be in). For those who cannot eat toast, and even for those who want something out of the ordinary for breakfast, this is the perfect recipe. Just be warned that this is one of the more involved breakfast setups, but it can be well worth it.

Chocolate Pavlova

Mom brought a recipe with her to make a chocolate pavlova, also care of Martha. Pavlova is pretty much like a giant meringue cookie. This one was in the shape of a bird nest, filled with a chocolate mousse, then topped with whipped cream and chocolate shavings. This dessert had it all: chewy, creamy, crunchy, chocolate. This is a great way to end a meal with a cup of coffee on the side.

Flourless Chocolate Beet Cake

For Mom's birthday, I made this interesting flourless chocolate beet cake. You shred some beets, cook them in agave nectar until tender, then stir in some cocoa powder and some other additives, bake it for twice as long as the directions say, et voila! a cake. We topped it with some whipped cream and served it. It looks like we tried to make a red velvet cake but only got halfway there. The cake itself is a deep red-brown with a dense, moist, chocolate flavor and a subtle hint of beets, but definitely in a good way.

Funfetti Cake

Lastly, I've started a cake decorating class at Durham Technical Community College. Yesterday was our first chance to work on a cake. Above you can see the Funfetti cake I made for the class.

Decorated Cake

Two problems arose while decorating the cake. First, I did not want to make a full cake just for this class, so I used a box cake, meaning an overly moist work surface. Second, I did not own 6" cake pans, so I just cut down my cakes from 8", all without using a guide or measuring tool of any kind. End result: the whimsical cake.

Disaster Cake

I was slightly embarrassed by the cake at first, but I still wanted to bring it into my lab for everyone to eat. But my buttercream was not quite up to snuff. I probably needed another cup or so of confectioner's sugar in it (it already had 10 cups in it), so it slowly oozed down the sides of the cake. The end result: the top layer slipped off the bottom layer in a giant mess. So next week, I will stop cutting corners and shoot for the moon.