Monday, January 25, 2010

PB&J Cheesecake

Another lab birthday and luckily this person likes cheesecake. It was nice to take a departure from the standard two-layer cake to make this rich, creamy cheesecake.

PB&J Cheesecake
Makes 10 servings

Ingredients
Crust
1.75 cup Nilla wafer crumbs
1 cup finely chopped almonds
1/2 cup melted butter
1/3 cup sugar
Filling
24oz cream cheese, softened
1.5 cups brown sugar, packed
3/4 cup peanut butter
1 egg yolk
3 eggs
1/3 cup heavy whipping cream
12oz strawberry jam
1 pint strawberries, sliced (plus one whole for decoration, if desired)

Directions


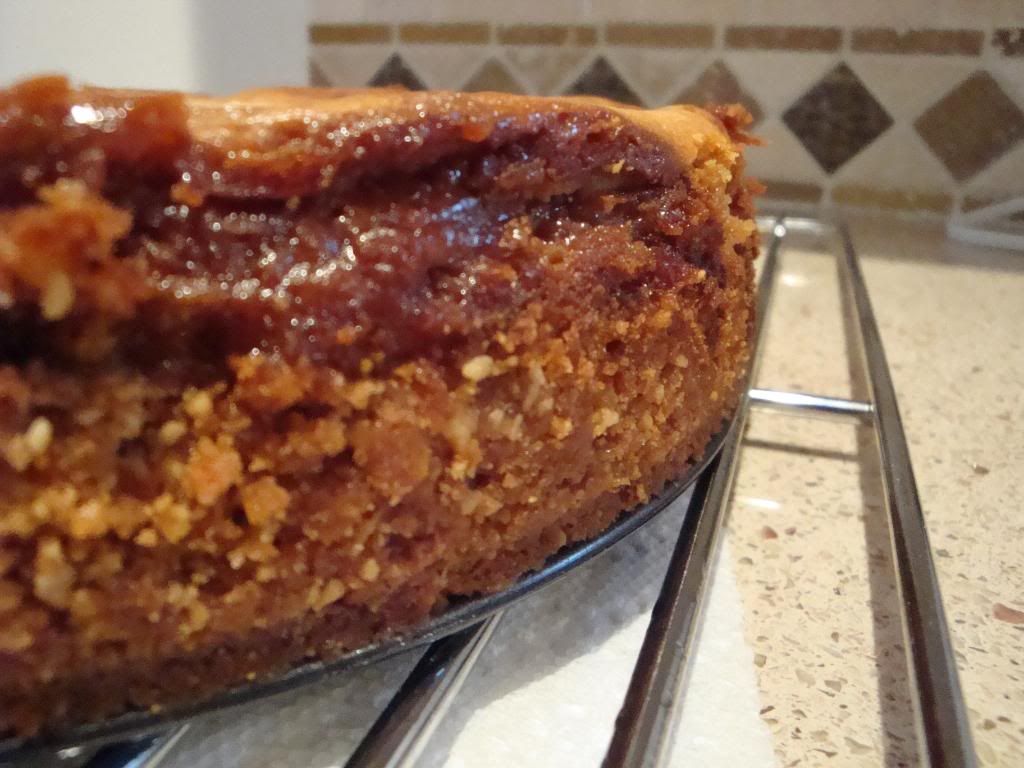
Preheat oven to 325 degrees. Combine all of the crust ingredients in a mixing bowl. Press the mixture in the bottom and one inch up the sides of a 10" springform pan. Bake crust for 10 minutes; cool. Above is what the crust must feel like from the inside of the pan.


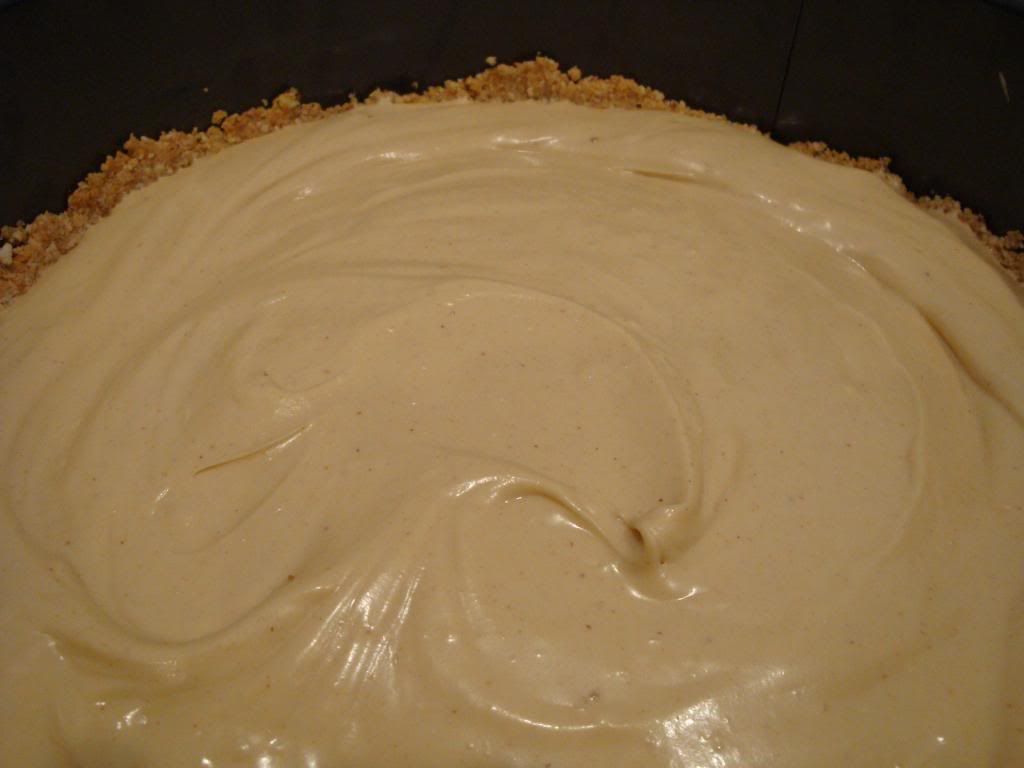
Using a mixer, beat the cream cheese until it is light and fluffy. Gradually add in the sugar, then the peanut butter and egg yolk and whole eggs, beating well after adding each ingredient. While beating on low speed, add cream. Pour half of this mixture into the cooled crust (see above).


In a microwave-safe bowl, melt strawberry jam. Heat on high for about 3 minutes, stirring after 30 second bursts. Jam should be very smooth. Slowly drizzle all of the jam over the PB batter.


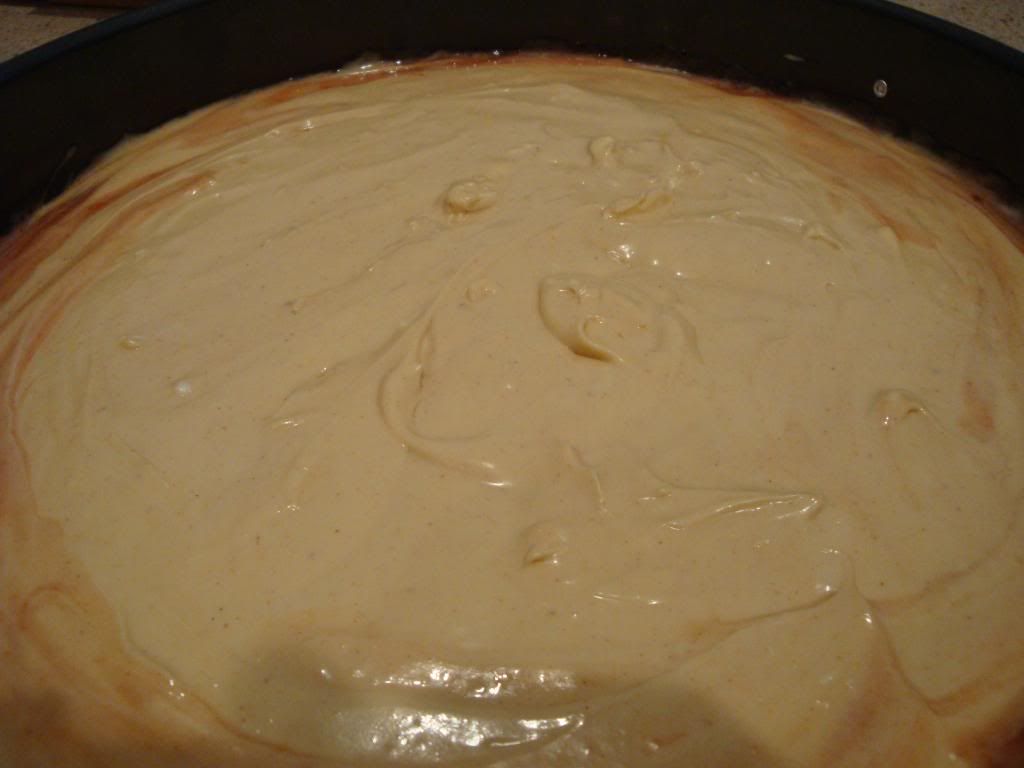
Swirl the layers with a knife. Pour on remaining batter.


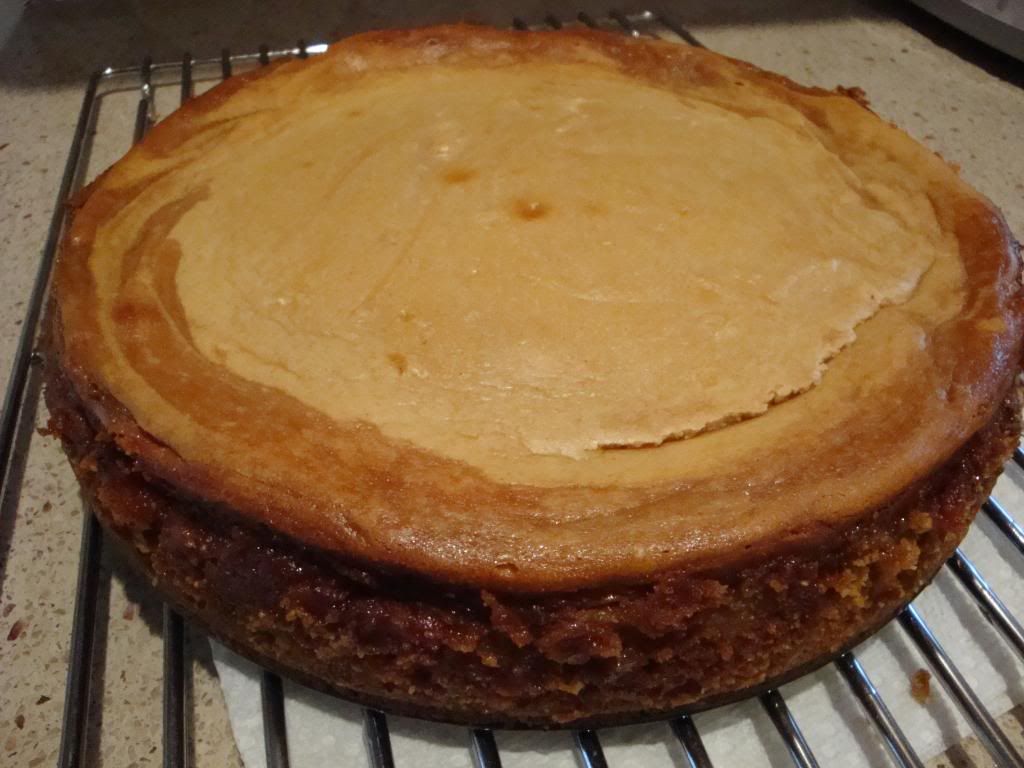
Bake cheesecake for 75 minutes. Remove from oven and cool completely on a wire rack. Gently run a knife around the edge of the cake and release the side. Cover cheesecake and refrigerate for at least 8 hours.


I arranged the sliced strawberries in concentric overlapping circles. When you're slicing the strawberries, you can reserve some of the smaller slices for the innermost circle. In the middle, I also cut a berry part of the way through to fan it out. The result is a cheesecake that wowed everyone. It enchants you with it's beautiful looks (like a red and white flower) but the real test is the taste. The peanut butter is only a small portion of the batter, but the end result was amazingly peanut buttery. You could taste some of the strawberry, but the main character in this show was PB. The berries add a different texture and a nice fresh contrast to the cheesecake. And it is also worth mentioning that this is the creamiest cheesecake I've ever made. Often, cheesecake can end up fluffy or a little dry. This one was just like they make in NYC. I would make this cheesecake again in a heartbeat, though I should probably wait a few weeks for my body to deal with the overall richness of this dessert.

Lemon Custard Pie

In keeping with the past few citrusy recipes, I celebrated last week's National Pie Day with this recipe for lemon custard pie from Gourmet magazine's last issue.


I skipped the crust-making steps and used a pre-made graham cracker crust. The filling is pretty much a lemon syrup that is turned into a custard. I used meyer lemons for this since I've been wanting to use these lemons for years. They have a smoother exterior and are supposed to be sweeter than normal lemons. I needed about 3 lemons for this recipe.


The pie turned out wonderfully flavor-wise. It was sweetly lemony, the near-perfect balance of tart and saccharine. On problem was that the filling seemed to dissolve the pre-made crust (see the crack in the picture), so next time I'll definitely make and blind-bake my own. But that was the only slight drawback on presentation and it had no effect on the flavor. For as much as citrus flavors are used for "summer" meals (think of lemonade), nothing gets you going like a mid-day snack of lemony goodness. It brings the same satisfaction as a lemon bar, except pie is involved. And who can say no to pie?

Clementine Pumpkin Cloverleafs

I miss reading Gourmet magazine. It has only been a few months since they had to close their doors, but it feels as if a year has passed since the last issue. Last February, the magazine published a recipe that I wanted to try for a couple reasons. Firstly, it uses citrus which is in season and wonderful right now. Secondly, I have very little experience using yeast to make breads. Most of my breads are quick and sweet (very cake-like). But now it's time to start working on rising techniques with this recipe for orange pumpkin cloverleafs.


I'm omitting the full recipe here because it is very long and I've provided the link above. I actually had a lot of fun making this roll. The initial kneading process was a little therapeutic. The dough slowly becomes more elastic as you work with it, which is very satisfying. After letting the dough rise, then punching it, then rising again, you divide the dough into small balls. Three balls go into each muffin tin cup, which are then baked.


The great part about this roll is that it separates into three little rolls. They are light when piping hot and become a bit more dense as they cool. You cannot taste the orange very well but the pumpkin is faintly there. But, in the end, it doesn't really matter. The point of it all is that I successfully made bread!

Garlic Mojo Hot Dogs

Back in July of last year, Bon Appetit ran an article about atypical ways to top your hot dog. It was the peak of summer and grilling was a way of life. Now that we're in the dead of winter, a little reminder of summer is in need. Nothing makes you think of warmth more than some grilled tubed meat.


Mojo is very tropical in flavor, which is no surprise since it hails from Cuba. In this version, you saute some garlic and tomato in lime and orange juices, with a little bit of cumin. After this simmers you season with salt and pepper. After grilling your dogs, place them on top of the bun with some sliced romaine. Then add chopped avocado, pineapple and the sauce. As a word of caution, I would try to use a lower-fat hot dog for this, either low-fat beef, pork or even poultry would do. The avocado and the sauce already have enough fat for most palettes. But aside from that, the sauce brightened up the dogs well. The tomatoes provided an element similar to ketchup while the mojo and avocado gave the meal a decidedly lighter feel. And considering we've been going through some cold spells recently, any glimmer that spring and summer are coming is a welcome change.

Saturday, January 16, 2010

Spiced Clementine-Honey Granita

My exploits with clementines continue! Even though it's bitterly cold outside right now, I've been in the mood to make some sort of frozen dessert. So here's what I put together:

Spiced Clementine-Honey Granita
Yields: 4 cups

Ingredients
3 cups water
1 cup sugar
1/2 cup honey
2 tbsp clementine zest
1 tbsp grated ginger
2 whole star anise
1 bay leaf
2 whole cloves
2 cup clementine juice (I cut mine with some orange juice)
3 tbsp lemon juice

Instructions
Combine the first eight ingredients in a large saucepan. Bring this mixture to a boil over medium-high heat. Boil until mixture is thick and reduced to 2 cups. Discard star anise, bay leaf and cloves. Cool.

At this point you can strain the mixture if you want a clear final product. I did not strain because I liked the flecks of orange zest. Add clementine and lemon juices to the mixture. If you want sorbet at this point, I would chill this mixture in the fridge, then put it into an ice cream maker. If you want a granita, put the mixture into a container and place in the freezer. Every 30-60 minutes, scrape the granita with a fork to break up the large chunks.

Spiced Clementine-Honey Granita

The end result is a complex combination of flavors. The clementine and honey dominates, but tones of clove, anise and bay leaf come through. I did not think bay leaf would be this good in a dessert, but it was quite amazing. I've never made a granita before and part of me felt it was going to be like eating a slushie without the flavorings. But it turns out the ice of a granita melts quickly, exuding the delicious flavors onto your taste buds.

Spiced Clementine-Honey Granita
The good thing is that one scoop is very satisfying. I don't feel compelled to make a huge sundae like I would with ice cream. So this dessert not only takes advantage of seasonal clementines, but it's also a great way to start off 2010 on the right foot.

Duchess Potatoes

Leftover Potatoes

Occasionally, as I eat my leftovers I have some odds and ends side dishes. A couple extra servings of green beans, a few ears of corn or, in my case, some mashed potatoes. At first I wanted to make some croquettes, but then I realized it would require some energy to form and fry them. I considered twice-baked potatoes, but then I remembered I needed intact skins for that. So I browsed through my recipe books for an idea, which came from one Julia Child.

Pre-baked Potatoes

I decided to turn my mashed potatoes into duchess potatoes. I vaguely remembering eating these potatoes as a side dish at a fancy dinner, perhaps on a cruise. But I had forgotten all about them. I would recommend starting with very smooth potatoes, either by thorough mashing, whipping or ricing. You can mix in some egg if your potatoes need some binding, but I omitted this step. I put my leftover potatoes into a large piping bag fixed with a large star tip (the one too big for traditional couplers). Then I formed all sorts of shapes: zigzags, tall spirals/rosettes, figure-eights, etc. I popped the tray into a 400 degree oven.

Duchess Potatoes

After about 15 minutes I got a little impatient. The outside of the potatoes had started to brown slightly, but I was hungry. So I turned on the broiler and slightly singed the potatoes, but other than a little extra color the potatoes came out looking good. The ridges formed by piping start to brown first, adding some beautiful contrast to the spuds.

Duchess Potatoes

I was very pleased with my revamped potatoes. They are a very simple way to make your formless side of potatoes into something more elegant. It's a little like the Ugly Duckling, just with potatoes.

Monday, January 11, 2010

Honey-Clementine Corn Muffins

Clementines

Clementines are in season. You can find them at your local grocery store in a wood carton containing about 50 of these little orange delights. The ones I had are called Cuties with some punny little stickers on them. So the next few recipes that I'll be posting will be clementine-derived. So if anyone is fighting about of scurvy, these recipes should make you right as rain.

Muffin Sandwich

Honey-Orange Corn Muffins
Unknown Source

Ingredients
Cooking spray
1 cup cornmeal
1 cup flour
3 tbsp baking powder
1/2 tsp salt
1 large egg
1/4 cup honey
3/4 cup clementine juice (orange works too)
3/4 cup vegetable oil

Instructions
Grease and flour a 12-cup muffin tin. Pre-heat oven to 400 degrees. In a large bowl, combine cornmeal, flour, baking powder, and salt, mixing well; set aside. In a medium bowl, beat egg, then mix in honey, juice, and oil. Add liquid mixture to the dry mixture. Stir until all the flour is wet, but avoid overmixing. Fill muffin cups approximately 3/4 full. Bake 15-20 minutes or until edges are golden and a toothpick inserted into the center comes out clean. Allow to cool completely in pan, then remove.

Corn Muffin Duo

These corn muffins came out very moist. One problem that can happen with cornmeal is that it can make dry baked goods. We've all had experiences eating cornbread or a corn muffin where we have to down a liter of water afterwards because the bread was a veritable desert. The honey comes through very subtly, but the orange flavor was not there at all. If I made these again, I would add some zest for that little extra punch of flavor.

Honey-Clementine Corn Muffins

Muffins are usually an excellent excuse to have cake for breakfast. But these corn muffins do not feel as decadent or indulgent. They could feasibly be part of a balanced breakfast. Add a little butter and/or some orange marmalade and you're set for a good day.

Wednesday, January 6, 2010

Eggplant Parmesan Pizza

Pizza is awesome. There are no two ways about it. You have to love pizza in all its forms from brick-oven Italian to huge and thin New York to huge and thick Chicago to general all-around Papa John's/Pizza Hut/Little Caesar's/Hungry Howies/Cici's goodness. What I love most about pizza is its flexibility as a canvas to paint with whatever flavors are hitting your taste buds at the moment. I have posted at least a couple of pizzas I made in 2009 and this is the last from last year: eggplant parmesan pizza.

Whole Pizza

The idea started in the grocery store, where many great concoctions start. I realized that eggplant parmesan had a lot of the same elements as pizza. Two in particular, mozzarella cheese and tomato sauce, sealed the deal in my mind for this creation. I would make eggplant filets as if I was going to make eggplant parmesan, except I would put it all on a pizza and bake it.

Eggplant Parmesan Pizza

Anything parmesan is pretty easy. In this case, I sliced an eggplant into 1/2" slices. I salted these to help draw out some of the bitterness. Next, I dunked each slice into eggs and then some seasoned breadcrumbs. I pan-fried them all until they had a nice golden crust. Word to the wise: don't cut your slices too thick or they won't cook all the way through at this point.

Eggplant Parmesan Pizza

Lastly, you have to assemble the pizza. Spread out the room temperature dough on a baking sheet or pizza pan. We used Trader Joe's whole wheat dough this time. Then spread the marinara sauce. Chop up the cooked eggplant slices into bite-size pieces, then scatter them on top of the sauced crust. Sprinkle generously with mozzarella cheese and any other toppings. We added fresh tomato and chopped basil to enhance the flavors. Bake the pie until the edges are crisp and the cheese is bubbling (time depends on the thickness of the crust, the number of ingredients, etc. The result is a wonderful mix of two Italian favorites. The eggplant comes out crisp on the outside and almost creamy on the inside. All the other classic flavors are there for support as well. See, no matter what you do to pizza, it's almost guaranteed to come out tasty.

Humble Pie

Late at night last week, we were a-wondering through parts of downtown Raleigh. We had no real direction, but our motivation was growling stomachs. After scoping out a couple menus, we ended up at Humble Pie. The restaurant has a huge letter H sign out front (which really just says H Pie). Inside is a casual, cozy atmosphere. The food overall panders to no one particular cuisine. We saw hints of Southern, Gulf Coast, Asian, Mexican, and others. This is what I think of as modern American cuisine: no flag-waving burgers or fireworks-shooting apple pie, but rather an amalgamation of the best of what the world has to offer. Pan-global would also be an apt term I suppose, but it's just not as catchy.

Oven Roasted Mahi Mahi

I ordered the oven roasted mahi mahi. The fish was cooked perfectly with a relish made of roasted red peppers and capers for that nice touch of brininess. It's odd that we don't want fish to be too fishy but we don't mind when it is salty like the ocean. As a more mellow accompaniment, there was a side of smoked gouda potatoes au gratin. I absolutely adore smoked gouda. I almost ordered this dish specifically for that cheese. And these potatoes did not let me down. They were creamy and buttery, with that smokiness perfusing every bite. I had a lot of fun eating this dish, bouncing between the smooth and the sharp flavors until it was all gone.

Grilled Andouille Sausage

We also ordered the grilled andouille sausage. The sausage was very good with that fiery fattiness that we expected. Grilling the sausage brought out more of the smokey flavors. The roasted corn sauce helped you soothe your pallet a bit before biting into the surprisingly delicious jalapeno-cheddar bread pudding. My only minus for this restaurant is that the portions were a little small. We left feeling just about sated, but that soon passed as we walked around in search of dessert. We certainly enjoyed everything we ate at Humble Pie, though, and think it is a great restaurant that fits right in in downtown Raleigh.

Tuesday, January 5, 2010

Champagne Pork Chops

You can only eat so many champagne cupcakes before you figure out you need another way to get rid of your champagne leftover from New Years. I decided to search on the Food Network website for some ideas. Emeril had a recipe that made a vanilla-infused champagne sauce. The only problem is the sauce requires the addition of more than a stick of butter. While that does sound rather decadent, I'm at least attempting to shed some of my winter blubber. So I used a Robin Miller recipe instead: pork chops in creamy champagne sauce.

Pork Chops in Creamy Champagne Sauce

This recipe pretty much uses champagne like any other wine to deglaze the pan after you've cooked the pork chops. Then you thicken the sauce with some flour mixed into some milk. The sauce does not have a strong champagne flavor, but the sparkling wine did add a sweetness to the sauce that complimented the shallots and worked well with the thyme.

As a side note, I got to use my new potato ricer to make the mashed potato side for this dish. Normally I just use my masher to make lumpy mashed potatoes. But this new ricer extrudes the potato through small holes, kind of like a Play Doh factory. The end result is a much smoother mashed potato. What a delicious way to kick off 2010.

Champagne Cupcakes

I'm not much of a drinker. Though I'm a graduate of a top ten party school, I never majored in ethanol. So inevitable, with New Years coming through, I end up with a bottle of champagne in my possession. What's a boy to do? Lucky for me, I found the answer:

Champagne Cupcakes
From Gimmesomeoven, yields 21 cupcakes

Ingredients
-Cupcakes-
2/3 cup unsalted butter, softened
1.5 cups sugar
2.75 cups flour
3 tsp baking powder
1 tsp salt
0.75 cups champagne
6 large egg whites
-Frosting-
1 cup unsalted butter, softened
3.25 cups powdered sugar
1/2 tsp vanilla extract
3 tbsp champagne, at room temperature

Directions
Preheat oven to 350 degrees F. Line a cupcake pan with paper cupcake liners.

In a large bowl, cream together butter and sugar until light and fluffy, about 2-3 minutes. In another bowl, sift flour, baking powder and salt together. Blend the flour mixture into the butter-sugar mixture alternately with the champagne.

In another large bowl (make sure it's clean), beat egg whites until stiff peaks form (about 5 minutes). Fold one-third of the whites into batter to lighten it. Fold in remaining whites. Fill cupcake liners about two-thirds full.

Bake for about 20 minutes, or until a toothpick inserted in the center comes out clean.

For the frosting, beat together butter and powdered sugar on low to blend, then on medium speed for two more minutes. Add vanilla extract and champagne, beating on medium for another minute. Add more champagne or milk, one tablespoon at a time, until the frosting is of the desired consistency. Frost the cupcakes to your liking and top with any other toppings (I used shaved chocolate bits).

Champagne Cupcakes

These cupcakes were quite the surprise. The cake itself came out nearly perfectly. They were not too dense and the egg whites made them more delicate. The taste of champagne permeated the cake, but was in harmony with the other flavors. I personally thought the frosting was just okay. It was a little sugary for me and a little overwhelming for the cake. The end result was still good though with nice champagne notes.

Champagne Cupcakes

Cooking with champagne is a great idea, as will be seen in my next post...

Chocolate Peppermint Cookies

Every year when I go home for Christmas, I'm asked to make a batch of chocolate chip cookies. After doing this for the past 7 years or so, it gets a little boring making the same cookies the same way, year after year. I do love tweaking recipes, though. While I am still required to make the classic cookies, I am free to innovate as I so choose. This year, I was struck with the idea for making chocolate peppermint cookies.

Original Nestle Toll House Chocolate Chip Cookies
Yields 60 cookies

Ingredients
2.25 cups flour
1 tsp baking soda
1 tsp salt
1 cup unsalted butter, softened
3/4 cup sugar
3/4 cup brown sugar
1 tsp vanilla extract
2 large eggs
2 cups chocolate chips
1 cup nuts, chopped (optional)

Directions
Preheat oven to 375 degrees F.

Combine flour, baking soda and salt in small bowl. Beat butter, sugars and vanilla extract in large bowl until creamy. Add eggs, one at a time, beating well after each addition. Gradually beat in flour mixture. Stir in chocolate chips and nuts. Drop by rounded tablespoons onto ungreased baking sheets.

Cookie Dough

Bake for 9-11 minutes or until golden brown. Cool on baking sheets for 2 minutes.

Baked Cookies

Remove to wire racks (or paper towels) to cool completely.

Cooling Cookies

For chocolate peppermint variation, replace 3/4 cup of the flour with unsweetened cocoa powder and replace chopped nuts with crushed peppermint candies. I used the peppermint sticks because they are softer and melt more easily as you eat them. You can also substitute peppermint extract for the vanilla extract if you want more of a permeating minty flavor, but I left that out so the mint was more subtle.

Chocolate Peppermint Cookies

The Nestle Toll House recipe is an American classic. It is incredibly easy, though that has not stopped Nestle from making break-n-bake cookie dough. Embellishing your own version is also quite simple. Add your own blend of spices or mix-ins to make a cookie you can call your own. And the result will nearly always be delicious.